-
1. Першыя крокі
- 1.1 About Version Control
- 1.2 A Short History of Git
- 1.3 What is Git?
- 1.4 The Command Line
- 1.5 Installing Git
- 1.6 First-Time Git Setup
- 1.7 Getting Help
- 1.8 Падсумаваньне
-
2. Git Basics
- 2.1 Getting a Git Repository
- 2.2 Recording Changes to the Repository
- 2.3 Viewing the Commit History
- 2.4 Undoing Things
- 2.5 Working with Remotes
- 2.6 Tagging
- 2.7 Git Aliases
- 2.8 Summary
-
3. Git Branching
- 3.1 Branches in a Nutshell
- 3.2 Basic Branching and Merging
- 3.3 Branch Management
- 3.4 Branching Workflows
- 3.5 Remote Branches
- 3.6 Rebasing
- 3.7 Summary
-
4. Git on the Server
- 4.1 The Protocols
- 4.2 Getting Git on a Server
- 4.3 Generating Your SSH Public Key
- 4.4 Setting Up the Server
- 4.5 Git Daemon
- 4.6 Smart HTTP
- 4.7 GitWeb
- 4.8 GitLab
- 4.9 Third Party Hosted Options
- 4.10 Summary
-
5. Distributed Git
- 5.1 Distributed Workflows
- 5.2 Contributing to a Project
- 5.3 Maintaining a Project
- 5.4 Summary
-
6. GitHub
-
7. Git Tools
- 7.1 Revision Selection
- 7.2 Interactive Staging
- 7.3 Stashing and Cleaning
- 7.4 Signing Your Work
- 7.5 Searching
- 7.6 Rewriting History
- 7.7 Reset Demystified
- 7.8 Advanced Merging
- 7.9 Rerere
- 7.10 Debugging with Git
- 7.11 Submodules
- 7.12 Bundling
- 7.13 Replace
- 7.14 Credential Storage
- 7.15 Summary
-
8. Customizing Git
- 8.1 Git Configuration
- 8.2 Git Attributes
- 8.3 Git Hooks
- 8.4 An Example Git-Enforced Policy
- 8.5 Summary
-
9. Git and Other Systems
- 9.1 Git as a Client
- 9.2 Migrating to Git
- 9.3 Summary
-
10. Git Internals
- 10.1 Plumbing and Porcelain
- 10.2 Git Objects
- 10.3 Git References
- 10.4 Packfiles
- 10.5 The Refspec
- 10.6 Transfer Protocols
- 10.7 Maintenance and Data Recovery
- 10.8 Environment Variables
- 10.9 Summary
-
A1. Дадатак A: Git in Other Environments
- A1.1 Graphical Interfaces
- A1.2 Git in Visual Studio
- A1.3 Git in Visual Studio Code
- A1.4 Git in IntelliJ / PyCharm / WebStorm / PhpStorm / RubyMine
- A1.5 Git in Sublime Text
- A1.6 Git in Bash
- A1.7 Git in Zsh
- A1.8 Git in PowerShell
- A1.9 Summary
-
A2. Дадатак B: Embedding Git in your Applications
- A2.1 Command-line Git
- A2.2 Libgit2
- A2.3 JGit
- A2.4 go-git
- A2.5 Dulwich
-
A3. Дадатак C: Git Commands
- A3.1 Setup and Config
- A3.2 Getting and Creating Projects
- A3.3 Basic Snapshotting
- A3.4 Branching and Merging
- A3.5 Sharing and Updating Projects
- A3.6 Inspection and Comparison
- A3.7 Debugging
- A3.8 Patching
- A3.9 Email
- A3.10 External Systems
- A3.11 Administration
- A3.12 Plumbing Commands
A1.8 Дадатак A: Git in Other Environments - Git in PowerShell
Git in PowerShell
The legacy command-line terminal on Windows (cmd.exe) isn’t really capable of a customized Git experience, but if you’re using PowerShell, you’re in luck.
This also works if you’re running PowerShell Core on Linux or macOS.
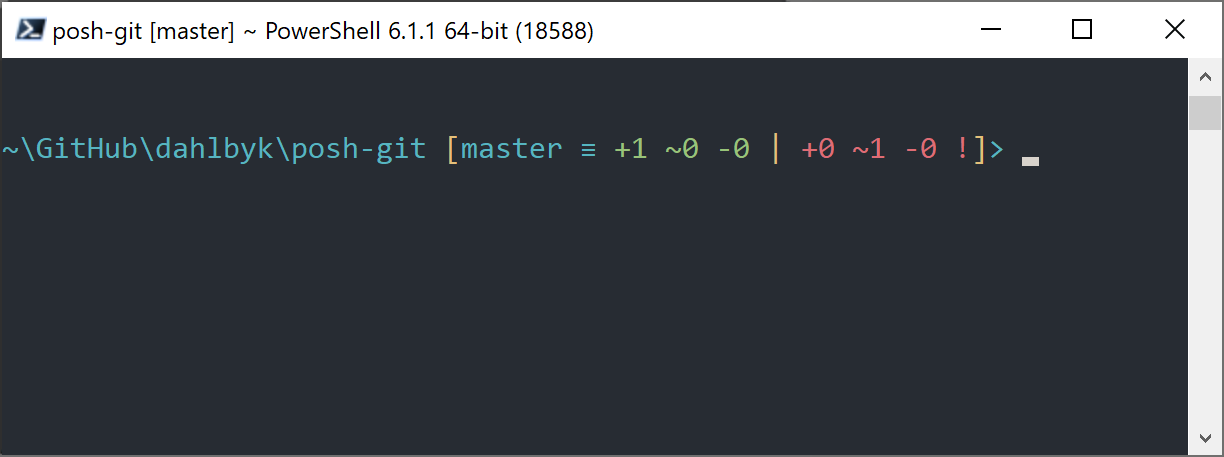
A package called posh-git (https://github.com/dahlbyk/posh-git) provides powerful tab-completion facilities, as well as an enhanced prompt to help you stay on top of your repository status.
It looks like this:

Installation
Prerequisites (Windows only)
Before you’re able to run PowerShell scripts on your machine, you need to set your local ExecutionPolicy to RemoteSigned (basically, anything except Undefined and Restricted).
If you choose AllSigned instead of RemoteSigned, also local scripts (your own) need to be digitally signed in order to be executed.
With RemoteSigned, only scripts having the ZoneIdentifier set to Internet (were downloaded from the web) need to be signed, others not.
If you’re an administrator and want to set it for all users on that machine, use -Scope LocalMachine.
If you’re a normal user, without administrative rights, you can use -Scope CurrentUser to set it only for you.
More about PowerShell Scopes: https://docs.microsoft.com/en-us/powershell/module/microsoft.powershell.core/about/about_scopes.
More about PowerShell ExecutionPolicy: https://docs.microsoft.com/en-us/powershell/module/microsoft.powershell.security/set-executionpolicy.
To set the value of ExecutionPolicy to RemoteSigned for all users use the next command:
> Set-ExecutionPolicy -Scope LocalMachine -ExecutionPolicy RemoteSigned -ForcePowerShell Gallery
If you have at least PowerShell 5 or PowerShell 4 with PackageManagement installed, you can use the package manager to install posh-git for you.
More information about PowerShell Gallery: https://docs.microsoft.com/en-us/powershell/scripting/gallery/overview.
> Install-Module posh-git -Scope CurrentUser -Force
> Install-Module posh-git -Scope CurrentUser -AllowPrerelease -Force # Newer beta version with PowerShell Core support
If you want to install posh-git for all users, use -Scope AllUsers instead and execute the command from an elevated PowerShell console.
If the second command fails with an error like Module 'PowerShellGet' was not installed by using Install-Module, you’ll need to run another command first:
> Install-Module PowerShellGet -Force -SkipPublisherCheckThen you can go back and try again. This happens, because the modules that ship with Windows PowerShell are signed with a different publishment certificate.
Update PowerShell Prompt
To include git information in your prompt, the posh-git module needs to be imported.
To have posh-git imported every time PowerShell starts, execute the Add-PoshGitToProfile command which will add the import statement into your $profile script.
This script is executed everytime you open a new PowerShell console.
Keep in mind, that there are multiple $profile scripts.
E. g. one for the console and a separate one for the ISE.
> Import-Module posh-git
> Add-PoshGitToProfile -AllHosts
From Source
Just download a posh-git release from https://github.com/dahlbyk/posh-git/releases, and uncompress it.
Then import the module using the full path to the posh-git.psd1 file:
> Import-Module <path-to-uncompress-folder>\src\posh-git.psd1
> Add-PoshGitToProfile -AllHosts
This will add the proper line to your profile.ps1 file, and posh-git will be active the next time you open PowerShell.
For a description of the Git status summary information displayed in the prompt see: https://github.com/dahlbyk/posh-git/blob/master/README.md#git-status-summary-information For more details on how to customize your posh-git prompt see: https://github.com/dahlbyk/posh-git/blob/master/README.md#customization-variables.
