-
1. Першыя крокі
- 1.1 About Version Control
- 1.2 A Short History of Git
- 1.3 What is Git?
- 1.4 The Command Line
- 1.5 Installing Git
- 1.6 First-Time Git Setup
- 1.7 Getting Help
- 1.8 Падсумаваньне
-
2. Git Basics
- 2.1 Getting a Git Repository
- 2.2 Recording Changes to the Repository
- 2.3 Viewing the Commit History
- 2.4 Undoing Things
- 2.5 Working with Remotes
- 2.6 Tagging
- 2.7 Git Aliases
- 2.8 Summary
-
3. Git Branching
- 3.1 Branches in a Nutshell
- 3.2 Basic Branching and Merging
- 3.3 Branch Management
- 3.4 Branching Workflows
- 3.5 Remote Branches
- 3.6 Rebasing
- 3.7 Summary
-
4. Git on the Server
- 4.1 The Protocols
- 4.2 Getting Git on a Server
- 4.3 Generating Your SSH Public Key
- 4.4 Setting Up the Server
- 4.5 Git Daemon
- 4.6 Smart HTTP
- 4.7 GitWeb
- 4.8 GitLab
- 4.9 Third Party Hosted Options
- 4.10 Summary
-
5. Distributed Git
- 5.1 Distributed Workflows
- 5.2 Contributing to a Project
- 5.3 Maintaining a Project
- 5.4 Summary
-
6. GitHub
-
7. Git Tools
- 7.1 Revision Selection
- 7.2 Interactive Staging
- 7.3 Stashing and Cleaning
- 7.4 Signing Your Work
- 7.5 Searching
- 7.6 Rewriting History
- 7.7 Reset Demystified
- 7.8 Advanced Merging
- 7.9 Rerere
- 7.10 Debugging with Git
- 7.11 Submodules
- 7.12 Bundling
- 7.13 Replace
- 7.14 Credential Storage
- 7.15 Summary
-
8. Customizing Git
- 8.1 Git Configuration
- 8.2 Git Attributes
- 8.3 Git Hooks
- 8.4 An Example Git-Enforced Policy
- 8.5 Summary
-
9. Git and Other Systems
- 9.1 Git as a Client
- 9.2 Migrating to Git
- 9.3 Summary
-
10. Git Internals
- 10.1 Plumbing and Porcelain
- 10.2 Git Objects
- 10.3 Git References
- 10.4 Packfiles
- 10.5 The Refspec
- 10.6 Transfer Protocols
- 10.7 Maintenance and Data Recovery
- 10.8 Environment Variables
- 10.9 Summary
-
A1. Дадатак A: Git in Other Environments
- A1.1 Graphical Interfaces
- A1.2 Git in Visual Studio
- A1.3 Git in Visual Studio Code
- A1.4 Git in IntelliJ / PyCharm / WebStorm / PhpStorm / RubyMine
- A1.5 Git in Sublime Text
- A1.6 Git in Bash
- A1.7 Git in Zsh
- A1.8 Git in PowerShell
- A1.9 Summary
-
A2. Дадатак B: Embedding Git in your Applications
- A2.1 Command-line Git
- A2.2 Libgit2
- A2.3 JGit
- A2.4 go-git
- A2.5 Dulwich
-
A3. Дадатак C: Git Commands
- A3.1 Setup and Config
- A3.2 Getting and Creating Projects
- A3.3 Basic Snapshotting
- A3.4 Branching and Merging
- A3.5 Sharing and Updating Projects
- A3.6 Inspection and Comparison
- A3.7 Debugging
- A3.8 Patching
- A3.9 Email
- A3.10 External Systems
- A3.11 Administration
- A3.12 Plumbing Commands
3.5 Git Branching - Remote Branches
Remote Branches
Remote references are references (pointers) in your remote repositories, including branches, tags, and so on.
You can get a full list of remote references explicitly with git ls-remote <remote>, or git remote show <remote> for remote branches as well as more information.
Nevertheless, a more common way is to take advantage of remote-tracking branches.
Remote-tracking branches are references to the state of remote branches. They’re local references that you can’t move; Git moves them for you whenever you do any network communication, to make sure they accurately represent the state of the remote repository. Think of them as bookmarks, to remind you where the branches in your remote repositories were the last time you connected to them.
Remote-tracking branch names take the form <remote>/<branch>.
For instance, if you wanted to see what the master branch on your origin remote looked like as of the last time you communicated with it, you would check the origin/master branch.
If you were working on an issue with a partner and they pushed up an iss53 branch, you might have your own local iss53 branch, but the branch on the server would be represented by the remote-tracking branch origin/iss53.
This may be a bit confusing, so let’s look at an example.
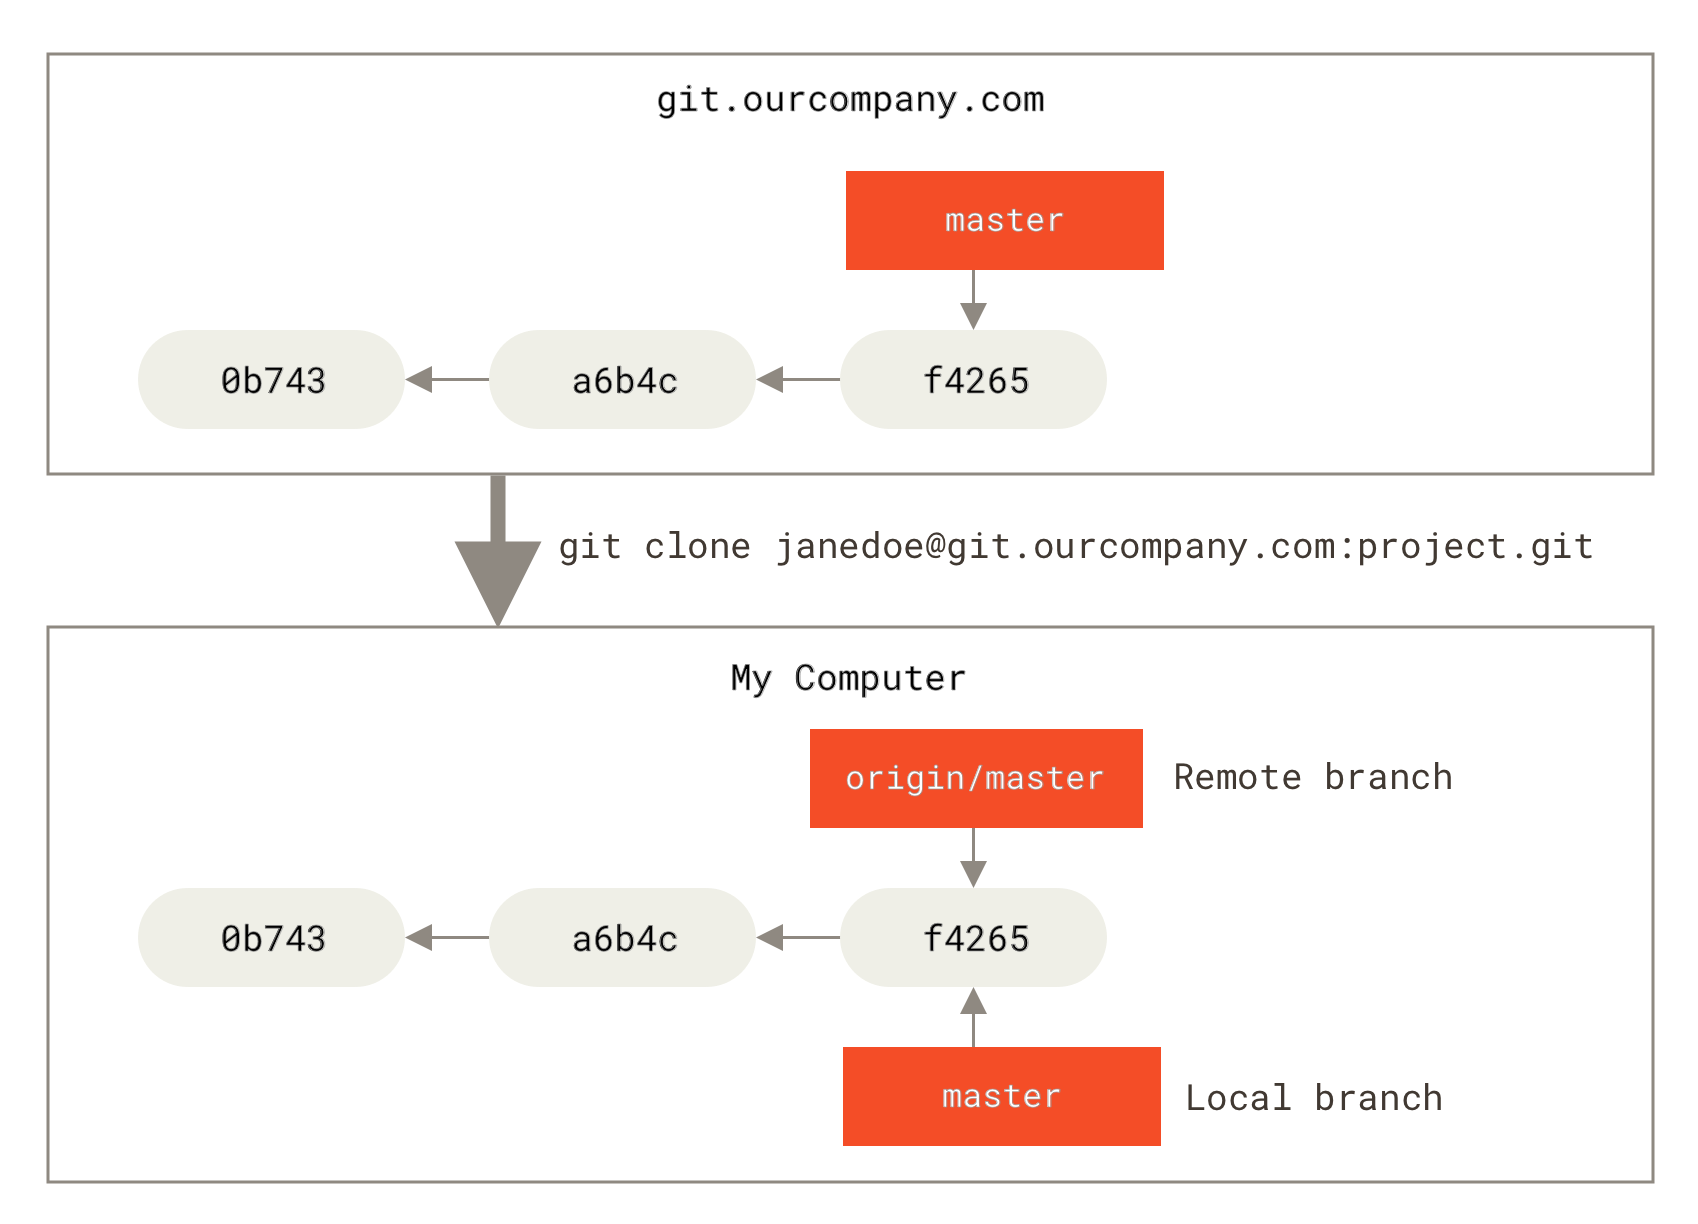
Let’s say you have a Git server on your network at git.ourcompany.com.
If you clone from this, Git’s clone command automatically names it origin for you, pulls down all its data, creates a pointer to where its master branch is, and names it origin/master locally.
Git also gives you your own local master branch starting at the same place as origin’s master branch, so you have something to work from.
|
Заўвага
|
“origin” is not special
Just like the branch name “master” does not have any special meaning in Git, neither does “origin”.
While “master” is the default name for a starting branch when you run |
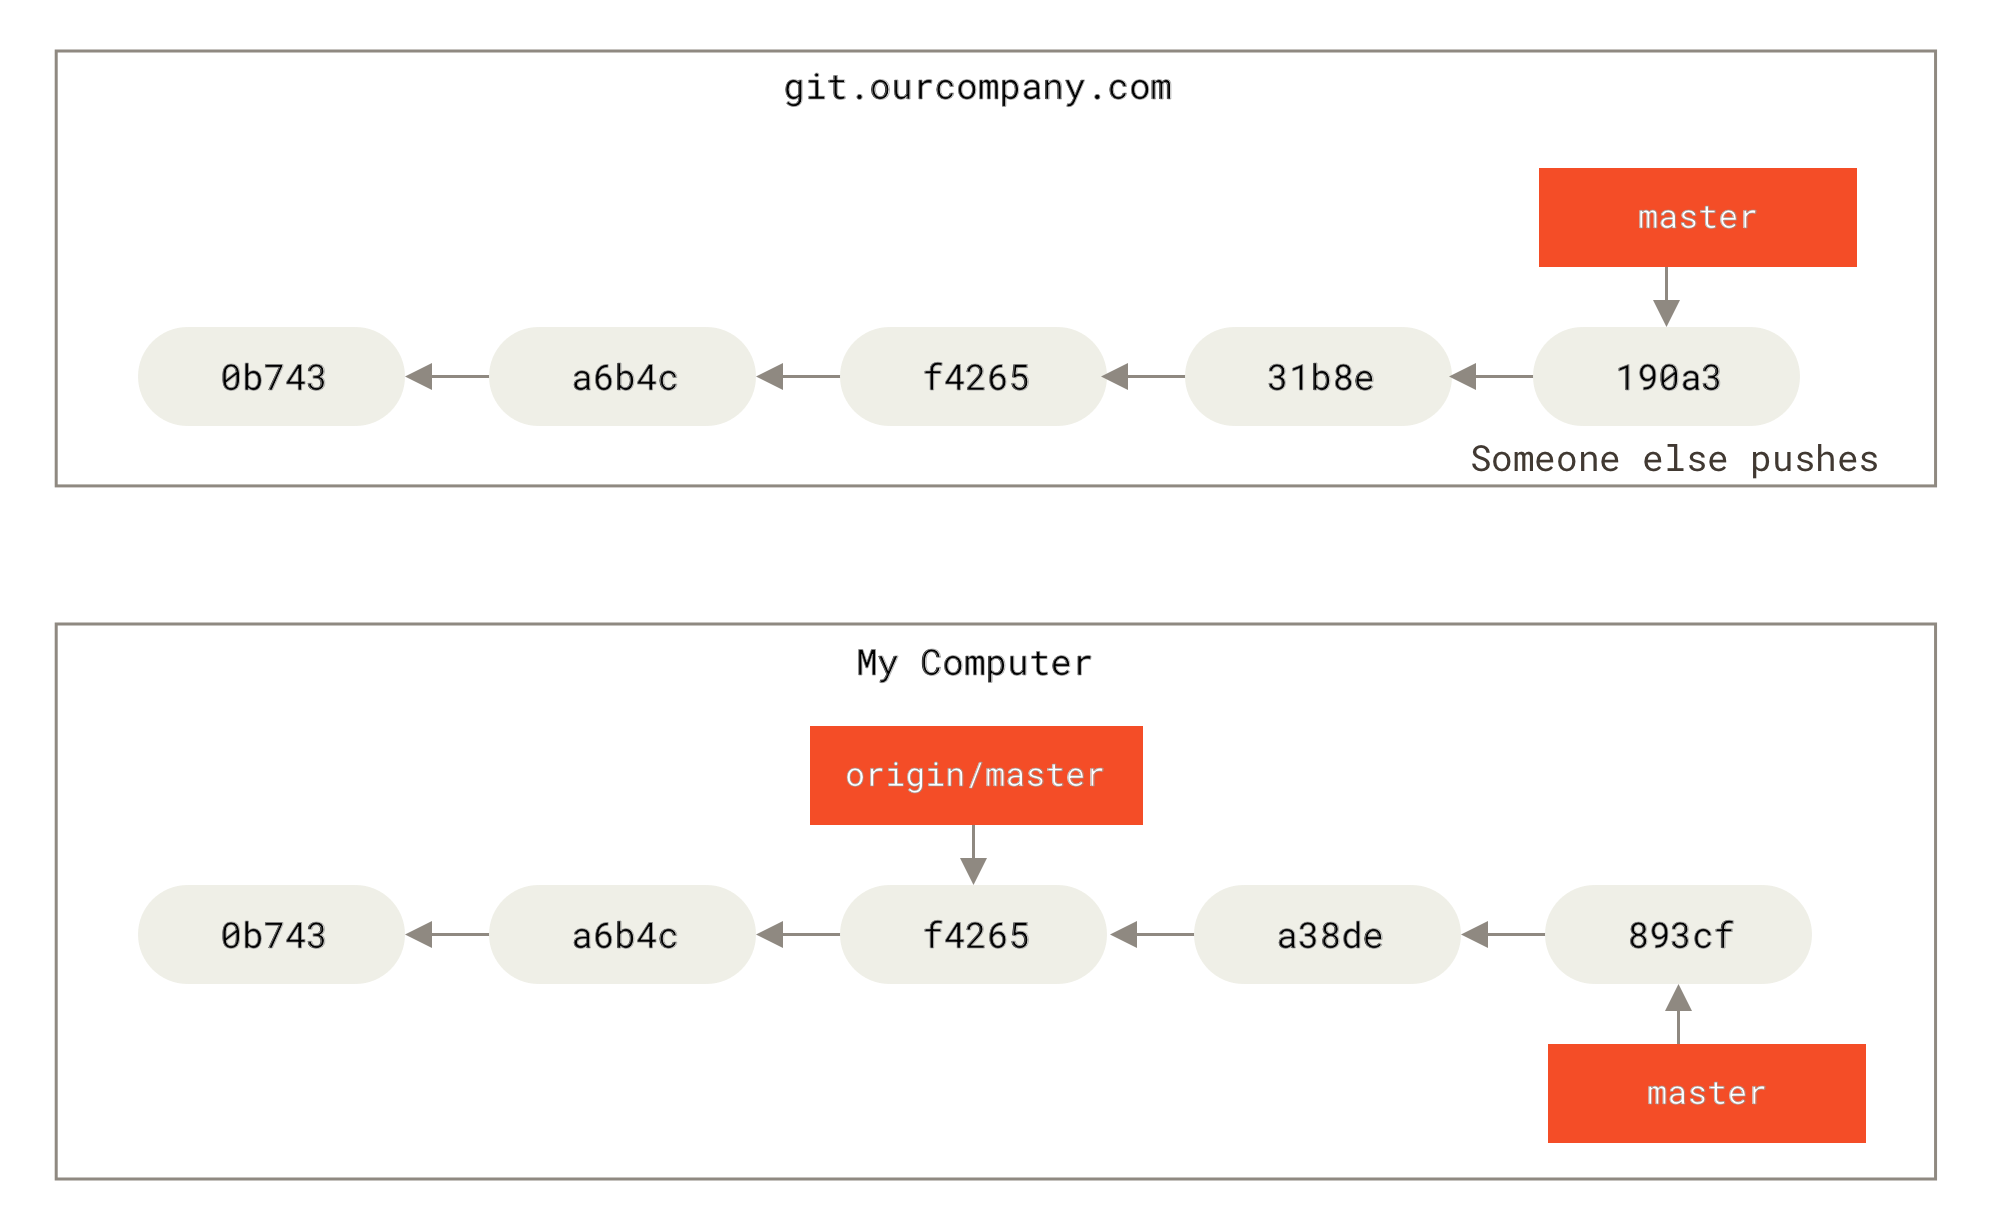
If you do some work on your local master branch, and, in the meantime, someone else pushes to git.ourcompany.com and updates its master branch, then your histories move forward differently.
Also, as long as you stay out of contact with your origin server, your origin/master pointer doesn’t move.
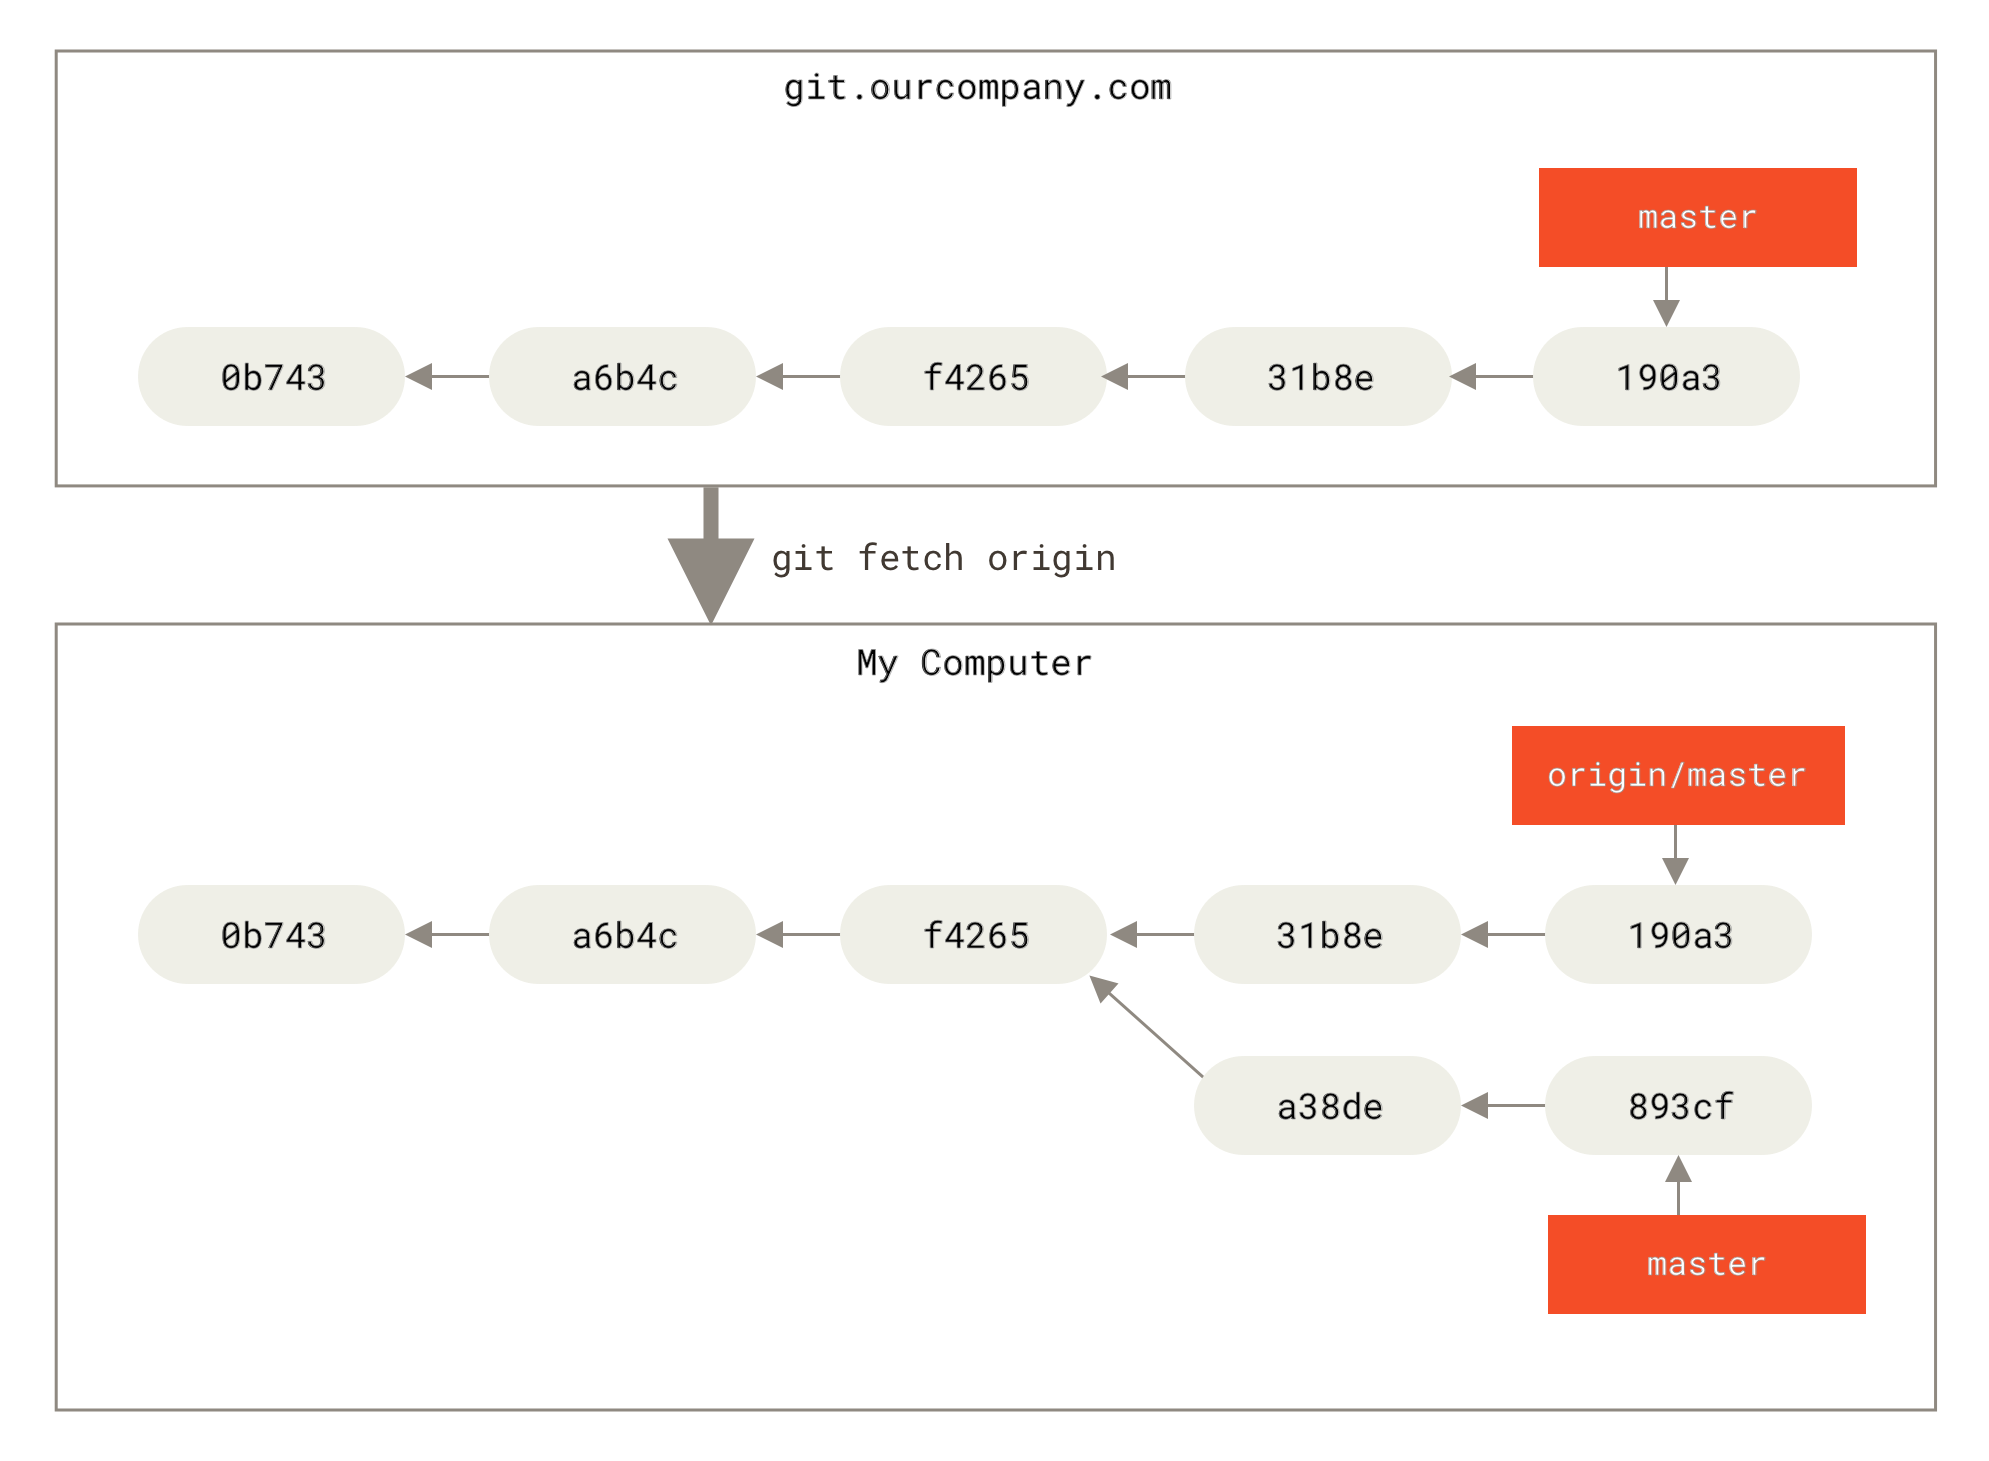
To synchronize your work with a given remote, you run a git fetch <remote> command (in our case, git fetch origin).
This command looks up which server “origin” is (in this case, it’s git.ourcompany.com), fetches any data from it that you don’t yet have, and updates your local database, moving your origin/master pointer to its new, more up-to-date position.
git fetch updates your remote-tracking branchesTo demonstrate having multiple remote servers and what remote branches for those remote projects look like, let’s assume you have another internal Git server that is used only for development by one of your sprint teams.
This server is at git.team1.ourcompany.com.
You can add it as a new remote reference to the project you’re currently working on by running the git remote add command as we covered in Git Basics.
Name this remote teamone, which will be your shortname for that whole URL.
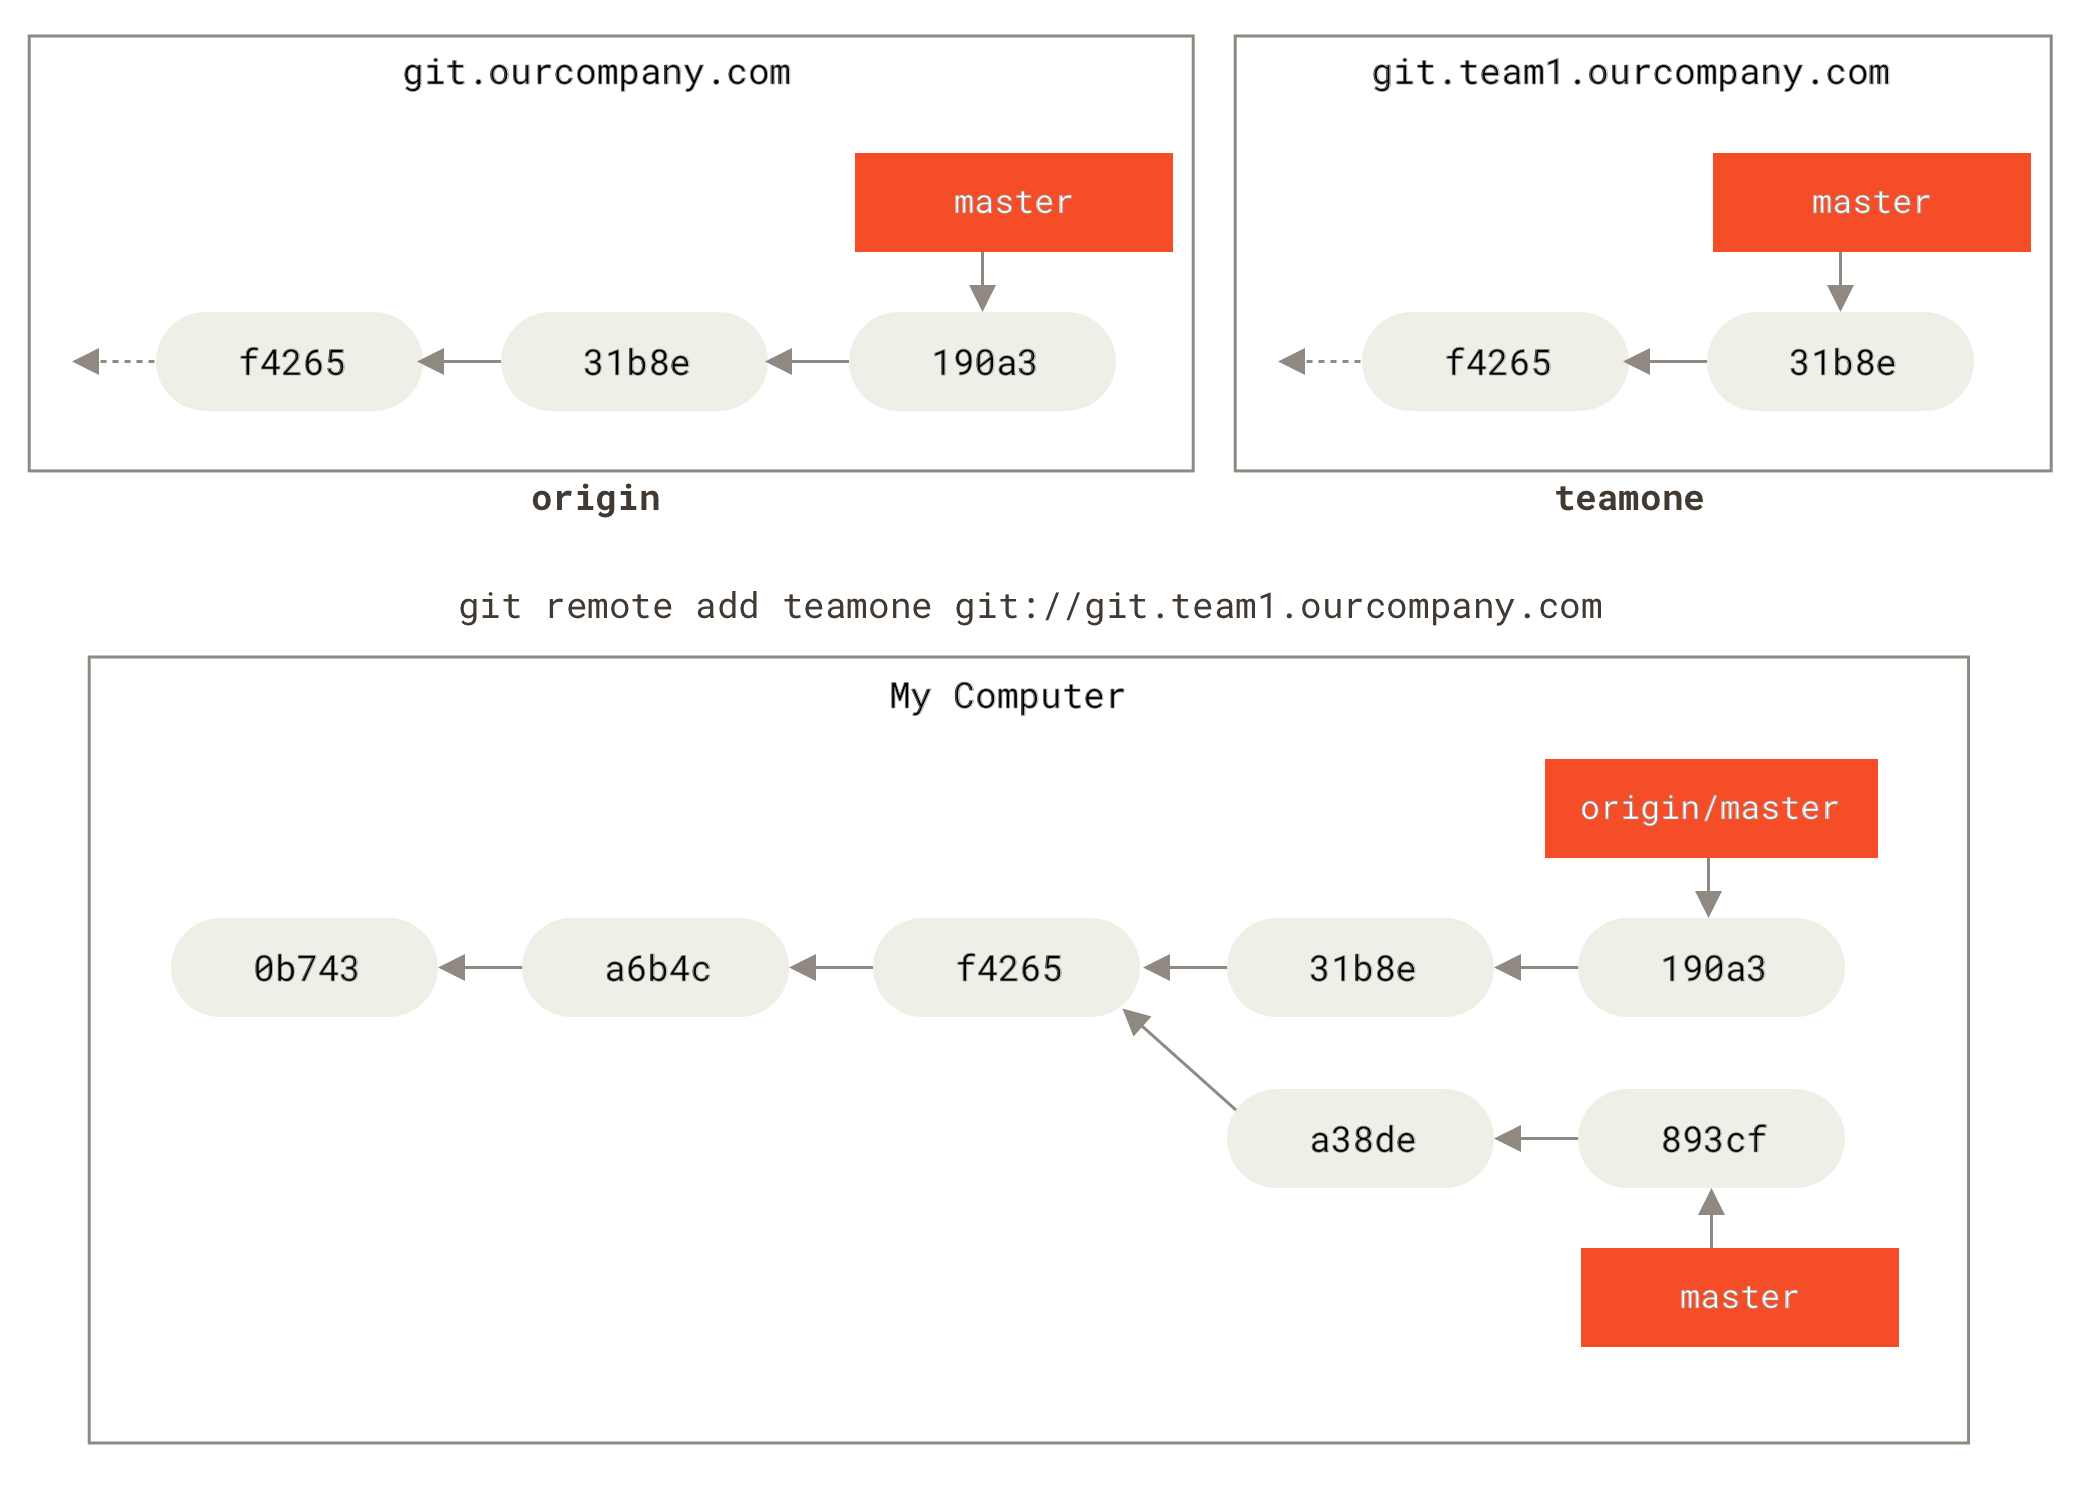
Now, you can run git fetch teamone to fetch everything the remote teamone server has that you don’t have yet.
Because that server has a subset of the data your origin server has right now, Git fetches no data but sets a remote-tracking branch called teamone/master to point to the commit that teamone has as its master branch.
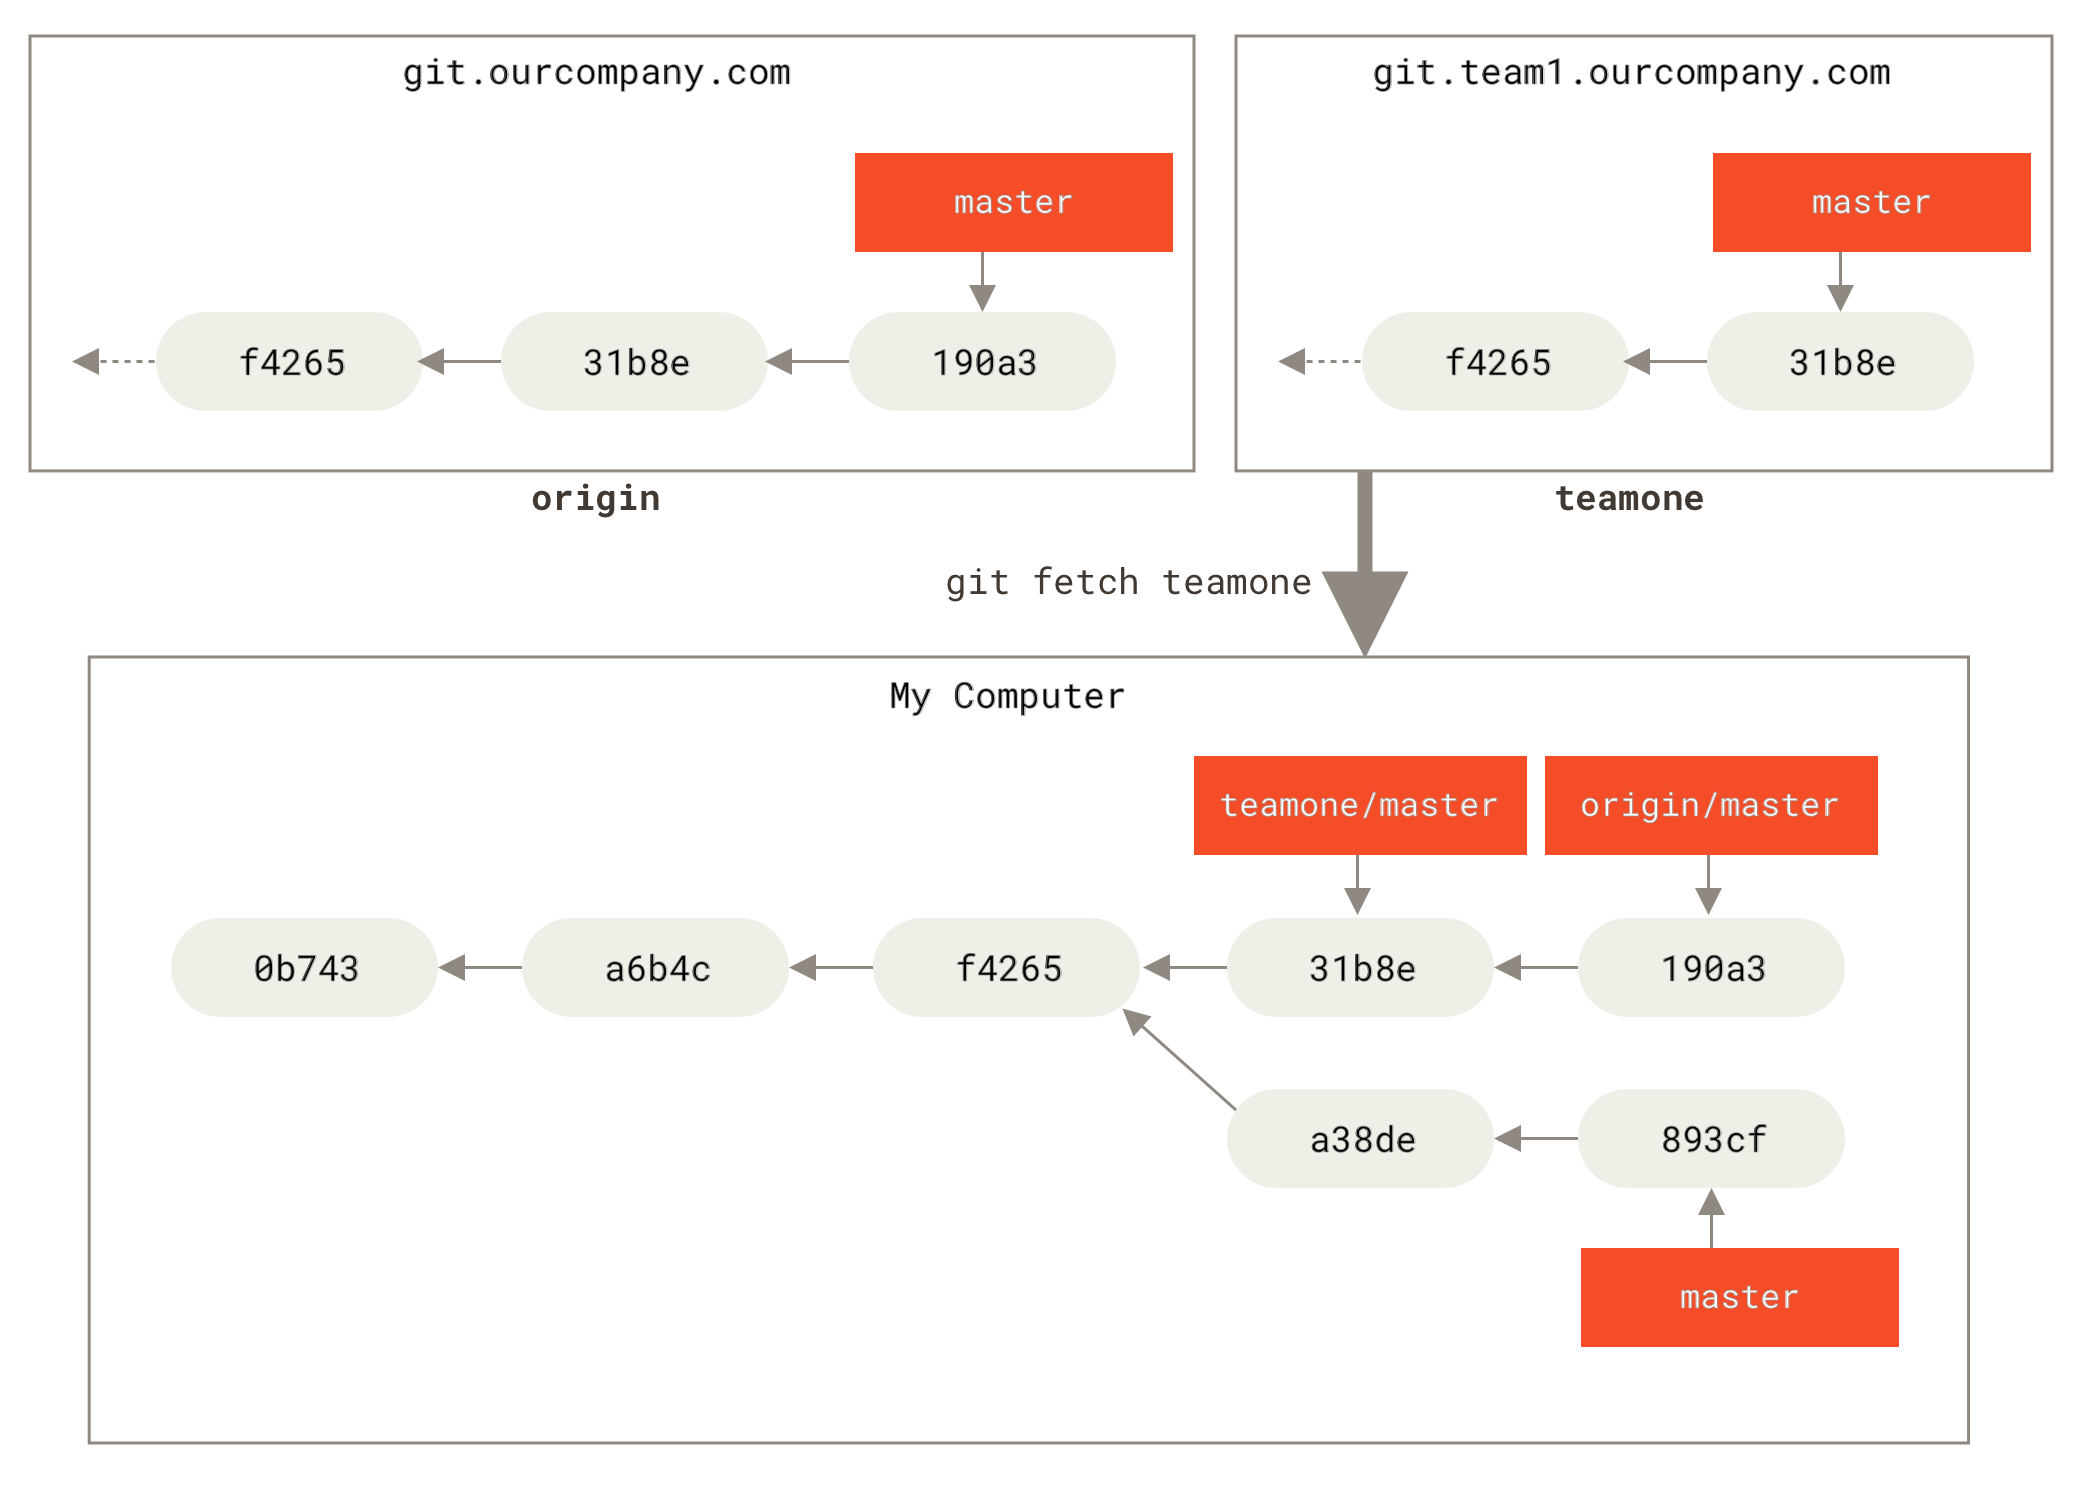
teamone/master
Pushing
When you want to share a branch with the world, you need to push it up to a remote to which you have write access. Your local branches aren’t automatically synchronized to the remotes you write to — you have to explicitly push the branches you want to share. That way, you can use private branches for work you don’t want to share, and push up only the topic branches you want to collaborate on.
If you have a branch named serverfix that you want to work on with others, you can push it up the same way you pushed your first branch.
Run git push <remote> <branch>:
$ git push origin serverfix
Counting objects: 24, done.
Delta compression using up to 8 threads.
Compressing objects: 100% (15/15), done.
Writing objects: 100% (24/24), 1.91 KiB | 0 bytes/s, done.
Total 24 (delta 2), reused 0 (delta 0)
To https://github.com/schacon/simplegit
 * [new branch]      serverfix -> serverfix
This is a bit of a shortcut.
Git automatically expands the serverfix branchname out to refs/heads/serverfix:refs/heads/serverfix, which means, “Take my serverfix local branch and push it to update the remote’s serverfix branch.”
We’ll go over the refs/heads/ part in detail in Git Internals, but you can generally leave it off.
You can also do git push origin serverfix:serverfix, which does the same thing — it says, “Take my serverfix and make it the remote’s serverfix.”
You can use this format to push a local branch into a remote branch that is named differently.
If you didn’t want it to be called serverfix on the remote, you could instead run git push origin serverfix:awesomebranch to push your local serverfix branch to the awesomebranch branch on the remote project.
|
Заўвага
|
Don’t type your password every time
If you’re using an HTTPS URL to push over, the Git server will ask you for your username and password for authentication. By default it will prompt you on the terminal for this information so the server can tell if you’re allowed to push. If you don’t want to type it every single time you push, you can set up a “credential cache”.
The simplest is just to keep it in memory for a few minutes, which you can easily set up by running For more information on the various credential caching options available, see Credential Storage. |
The next time one of your collaborators fetches from the server, they will get a reference to where the server’s version of serverfix is under the remote branch origin/serverfix:
$ git fetch origin
remote: Counting objects: 7, done.
remote: Compressing objects: 100% (2/2), done.
remote: Total 3 (delta 0), reused 3 (delta 0)
Unpacking objects: 100% (3/3), done.
From https://github.com/schacon/simplegit
 * [new branch]      serverfix    -> origin/serverfix
It’s important to note that when you do a fetch that brings down new remote-tracking branches, you don’t automatically have local, editable copies of them.
In other words, in this case, you don’t have a new serverfix branch — you have only an origin/serverfix pointer that you can’t modify.
To merge this work into your current working branch, you can run git merge origin/serverfix.
If you want your own serverfix branch that you can work on, you can base it off your remote-tracking branch:
$ git checkout -b serverfix origin/serverfix
Branch serverfix set up to track remote branch serverfix from origin.
Switched to a new branch 'serverfix'
This gives you a local branch that you can work on that starts where origin/serverfix is.
Tracking Branches
Checking out a local branch from a remote-tracking branch automatically creates what is called a “tracking branch” (and the branch it tracks is called an “upstream branch”).
Tracking branches are local branches that have a direct relationship to a remote branch.
If you’re on a tracking branch and type git pull, Git automatically knows which server to fetch from and which branch to merge in.
When you clone a repository, it generally automatically creates a master branch that tracks origin/master.
However, you can set up other tracking branches if you wish — ones that track branches on other remotes, or don’t track the master branch.
The simple case is the example you just saw, running git checkout -b <branch> <remote>/<branch>.
This is a common enough operation that Git provides the --track shorthand:
$ git checkout --track origin/serverfix
Branch serverfix set up to track remote branch serverfix from origin.
Switched to a new branch 'serverfix'
In fact, this is so common that there’s even a shortcut for that shortcut. If the branch name you’re trying to checkout (a) doesn’t exist and (b) exactly matches a name on only one remote, Git will create a tracking branch for you:
$ git checkout serverfix
Branch serverfix set up to track remote branch serverfix from origin.
Switched to a new branch 'serverfix'
To set up a local branch with a different name than the remote branch, you can easily use the first version with a different local branch name:
$ git checkout -b sf origin/serverfix
Branch sf set up to track remote branch serverfix from origin.
Switched to a new branch 'sf'
Now, your local branch sf will automatically pull from origin/serverfix.
If you already have a local branch and want to set it to a remote branch you just pulled down, or want to change the upstream branch you’re tracking, you can use the -u or --set-upstream-to option to git branch to explicitly set it at any time.
$ git branch -u origin/serverfix
Branch serverfix set up to track remote branch serverfix from origin.|
Заўвага
|
Upstream shorthand
When you have a tracking branch set up, you can reference its upstream branch with the |
If you want to see what tracking branches you have set up, you can use the -vv option to git branch.
This will list out your local branches with more information including what each branch is tracking and if your local branch is ahead, behind or both.
$ git branch -vv
  iss53     7e424c3 [origin/iss53: ahead 2] Add forgotten brackets
  master    1ae2a45 [origin/master] Deploy index fix
* serverfix f8674d9 [teamone/server-fix-good: ahead 3, behind 1] This should do it
  testing   5ea463a Try something new
So here we can see that our iss53 branch is tracking origin/iss53 and is “ahead” by two, meaning that we have two commits locally that are not pushed to the server.
We can also see that our master branch is tracking origin/master and is up to date.
Next we can see that our serverfix branch is tracking the server-fix-good branch on our teamone server and is ahead by three and behind by one, meaning that there is one commit on the server we haven’t merged in yet and three commits locally that we haven’t pushed.
Finally we can see that our testing branch is not tracking any remote branch.
It’s important to note that these numbers are only since the last time you fetched from each server. This command does not reach out to the servers, it’s telling you about what it has cached from these servers locally. If you want totally up to date ahead and behind numbers, you’ll need to fetch from all your remotes right before running this. You could do that like this:
$ git fetch --all; git branch -vvPulling
While the git fetch command will fetch all the changes on the server that you don’t have yet, it will not modify your working directory at all.
It will simply get the data for you and let you merge it yourself.
However, there is a command called git pull which is essentially a git fetch immediately followed by a git merge in most cases.
If you have a tracking branch set up as demonstrated in the last section, either by explicitly setting it or by having it created for you by the clone or checkout commands, git pull will look up what server and branch your current branch is tracking, fetch from that server and then try to merge in that remote branch.
Generally it’s better to simply use the fetch and merge commands explicitly as the magic of git pull can often be confusing.
Deleting Remote Branches
Suppose you’re done with a remote branch — say you and your collaborators are finished with a feature and have merged it into your remote’s master branch (or whatever branch your stable codeline is in).
You can delete a remote branch using the --delete option to git push.
If you want to delete your serverfix branch from the server, you run the following:
$ git push origin --delete serverfix
To https://github.com/schacon/simplegit
 - [deleted]         serverfix
Basically all this does is remove the pointer from the server. The Git server will generally keep the data there for a while until a garbage collection runs, so if it was accidentally deleted, it’s often easy to recover.
