-
1. Úvod
- 1.1 Správa verzí
- 1.2 Stručná historie systému Git
- 1.3 Základy systému Git
- 1.4 Příkazový řádek
- 1.5 Instalace systému Git
- 1.6 První nastavení systému Git
- 1.7 Získání nápovědy
- 1.8 Shrnutí
-
2. Základy práce se systémem Git
-
3. Větve v systému Git
- 3.1 Větve v kostce
- 3.2 Základy větvení a slučování
- 3.3 Správa větví
- 3.4 Postupy při práci s větvemi
- 3.5 Vzdálené větve
- 3.6 Přeskládání
- 3.7 Shrnutí
-
4. Git na serveru
- 4.1 Protokoly
- 4.2 Zprovoznění Gitu na serveru
- 4.3 Generování veřejného klíče SSH
- 4.4 Nastavení serveru
- 4.5 Démon Git
- 4.6 Chytrý HTTP
- 4.7 GitWeb
- 4.8 GitLab
- 4.9 Možnosti hostování u třetí strany
- 4.10 Shrnutí
-
5. Distribuovaný Git
- 5.1 Distribuované pracovní postupy
- 5.2 Přispívání do projektu
- 5.3 Správa projektu
- 5.4 Shrnutí
-
6. GitHub
-
7. Git Tools
- 7.1 Revision Selection
- 7.2 Interactive Staging
- 7.3 Stashing and Cleaning
- 7.4 Signing Your Work
- 7.5 Searching
- 7.6 Rewriting History
- 7.7 Reset Demystified
- 7.8 Advanced Merging
- 7.9 Rerere
- 7.10 Ladění v systému Git
- 7.11 Submodules
- 7.12 Bundling
- 7.13 Replace
- 7.14 Credential Storage
- 7.15 Shrnutí
-
8. Customizing Git
- 8.1 Git Configuration
- 8.2 Atributy Git
- 8.3 Git Hooks
- 8.4 An Example Git-Enforced Policy
- 8.5 Shrnutí
-
9. Git a ostatní systémy
- 9.1 Git as a Client
- 9.2 Migrating to Git
- 9.3 Shrnutí
-
10. Git Internals
- 10.1 Plumbing and Porcelain
- 10.2 Git Objects
- 10.3 Git References
- 10.4 Balíčkové soubory
- 10.5 The Refspec
- 10.6 Přenosové protokoly
- 10.7 Správa a obnova dat
- 10.8 Environment Variables
- 10.9 Shrnutí
-
A1. Appendix A: Git in Other Environments
- A1.1 Graphical Interfaces
- A1.2 Git in Visual Studio
- A1.3 Git in Eclipse
- A1.4 Git in Bash
- A1.5 Git in Zsh
- A1.6 Git in Powershell
- A1.7 Shrnutí
-
A2. Appendix B: Embedding Git in your Applications
- A2.1 Command-line Git
- A2.2 Libgit2
- A2.3 JGit
-
A3. Appendix C: Git Commands
- A3.1 Setup and Config
- A3.2 Getting and Creating Projects
- A3.3 Basic Snapshotting
- A3.4 Branching and Merging
- A3.5 Sharing and Updating Projects
- A3.6 Inspection and Comparison
- A3.7 Debugging
- A3.8 Patching
- A3.9 Email
- A3.10 External Systems
- A3.11 Administration
- A3.12 Plumbing Commands
10.2 Git Internals - Git Objects
Git Objects
Git je obsahově adresovatelný systém souborů.
Výborně.
A co to znamená?
Znamená to, že v jádru systému Git se nachází jednoduché úložiště dat, ke kterému lze přistupovat pomocí klíčů.
Můžete do něj vložit jakýkoli obsah a na oplátku dostanete klíč, který můžete kdykoli v budoucnu použít k vyzvednutí obsahu.
Abychom to předvedli, můžete použít nízkoúrovňový příkaz hash-object, který vezme určitá data, uloží je v adresáři .git a vrátí vám klíč, pod nímž jsou tato data uložena.
Vytvořme nejprve nový repozitář Git. Můžeme se přesvědčit, že je adresář objects prázdný:
$ git init test
Initialized empty Git repository in /tmp/test/.git/
$ cd test
$ find .git/objects
.git/objects
.git/objects/info
.git/objects/pack
$ find .git/objects -type f
Git inicializoval adresář objects a vytvořil v něm podadresáře pack a info, nenajdeme tu však žádné skutečné soubory.
Nyní můžete uložit kousek textu do databáze Git:
$ echo 'test content' | git hash-object -w --stdin
d670460b4b4aece5915caf5c68d12f560a9fe3e4
Parametr -w sděluje příkazu hash-object, aby objekt uložil. Bez parametru by vám příkaz jen sdělil, jaký klíč by byl přidělen.
--stdin tells the command to read the content from stdin; if you don’t specify this, hash-object expects a file path at the end.
Výstupem příkazu je 40znakový otisk kontrolního součtu (checksum hash).
This is the SHA-1 hash – a checksum of the content you’re storing plus a header, which you’ll learn about in a bit.
Nyní se můžete podívat, jak Git vaše data uložil:
$ find .git/objects -type f
.git/objects/d6/70460b4b4aece5915caf5c68d12f560a9fe3e4
Vidíte, že v adresáři objects přibyl nový soubor.
This is how Git stores the content initially – as a single file per piece of content, named with the SHA-1 checksum of the content and its header.
The subdirectory is named with the first 2 characters of the SHA-1, and the filename is the remaining 38 characters.
Obsah můžete ze systému Git zase vytáhnout, k tomu slouží příkaz cat-file.
Tento příkaz je něco jako švýcarský nůž k prohlížení objektů Git.
Přidáte-li k příkazu cat-file parametr -p, říkáte mu, aby zjistil typ obsahu a přehledně vám ho zobrazil:
$ git cat-file -p d670460b4b4aece5915caf5c68d12f560a9fe3e4
test content
Nyní tedy umíte vložit do systému Git určitý obsah a ten poté zase vytáhnout. Totéž můžete udělat také s obsahem v souborech. Na souboru můžete například provádět jednoduché verzování. Vytvořte nový soubor a uložte jeho obsah do své databáze:
$ echo 'version 1' > test.txt
$ git hash-object -w test.txt
83baae61804e65cc73a7201a7252750c76066a30
Poté do souboru zapište nový obsah a znovu ho uložte:
$ echo 'version 2' > test.txt
$ git hash-object -w test.txt
1f7a7a472abf3dd9643fd615f6da379c4acb3e3a
Vaše databáze obsahuje dvě nové verze souboru a počáteční obsah, který jste do ní vložili:
$ find .git/objects -type f
.git/objects/1f/7a7a472abf3dd9643fd615f6da379c4acb3e3a
.git/objects/83/baae61804e65cc73a7201a7252750c76066a30
.git/objects/d6/70460b4b4aece5915caf5c68d12f560a9fe3e4
Soubor nyní můžete vrátit do první verze:
$ git cat-file -p 83baae61804e65cc73a7201a7252750c76066a30 > test.txt
$ cat test.txt
version 1
Nebo do druhé verze:
$ git cat-file -p 1f7a7a472abf3dd9643fd615f6da379c4acb3e3a > test.txt
$ cat test.txt
version 2
But remembering the SHA-1 key for each version of your file isn’t practical; plus, you aren’t storing the filename in your system – just the content.
Tento typ objektu se nazývá blob.
Zadáte-li příkaz cat-file -t v kombinaci s klíčem SHA-1 objektu, Git vám sdělí jeho typ, ať se jedná o jakýkoli objekt Git.
$ git cat-file -t 1f7a7a472abf3dd9643fd615f6da379c4acb3e3a
blob
Tree Objects
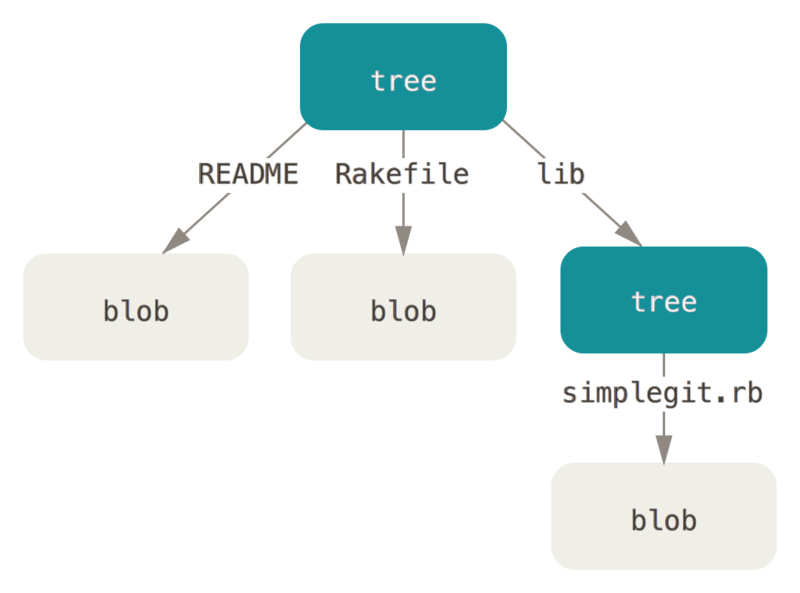
The next type we’ll look at is the tree, which solves the problem of storing the filename and also allows you to store a group of files together. Git ukládá obsah podobným způsobem jako systém souborů UNIX, jen trochu jednodušeji. Veškerý obsah se ukládá v podobě objektů typu strom a blob. Stromy odpovídají položkám v adresáři UNIX a bloby víceméně odpovídají i-uzlům nebo obsahům souborů. Jeden objekt stromu obsahuje jednu nebo více položek stromu, z nichž každá obsahuje ukazatel SHA-1 na blob nebo podstrom s asociovaným režimem, typem a názvem souboru. For example, the most recent tree in a project may look something like this:
$ git cat-file -p master^{tree}
100644 blob a906cb2a4a904a152e80877d4088654daad0c859      README
100644 blob 8f94139338f9404f26296befa88755fc2598c289      Rakefile
040000 tree 99f1a6d12cb4b6f19c8655fca46c3ecf317074e0      lib
Syntaxe master^{tree} určuje objekt stromu, na nějž ukazuje poslední revize větve master.
Notice that the lib subdirectory isn’t a blob but a pointer to another tree:
$ git cat-file -p 99f1a6d12cb4b6f19c8655fca46c3ecf317074e0
100644 blob 47c6340d6459e05787f644c2447d2595f5d3a54b      simplegit.rb
Conceptually, the data that Git is storing is something like this:

You can fairly easily create your own tree.
Git normally creates a tree by taking the state of your staging area or index and writing a series of tree objects from it.
Proto chcete-li vytvořit objekt stromu, musíte ze všeho nejdříve připravit soubory k zapsání, a vytvořit tak index.
To create an index with a single entry – the first version of your test.txt file – you can use the plumbing command update-index.
You use this command to artificially add the earlier version of the test.txt file to a new staging area.
You must pass it the --add option because the file doesn’t yet exist in your staging area (you don’t even have a staging area set up yet) and --cacheinfo because the file you’re adding isn’t in your directory but is in your database.
K tomu všemu přidáte režim, SHA-1 a název souboru:
$ git update-index --add --cacheinfo 100644 \
  83baae61804e65cc73a7201a7252750c76066a30 test.txt
In this case, you’re specifying a mode of 100644, which means it’s a normal file.
Other options are 100755, which means it’s an executable file; and 120000, which specifies a symbolic link.
The mode is taken from normal UNIX modes but is much less flexible – these three modes are the only ones that are valid for files (blobs) in Git (although other modes are used for directories and submodules).
Nyní můžete použít příkaz write-tree, jímž zapíšete stav oblasti připravovaných změn neboli indexu do objektu stromu.
No -w option is needed – calling write-tree automatically creates a tree object from the state of the index if that tree doesn’t yet exist:
$ git write-tree
d8329fc1cc938780ffdd9f94e0d364e0ea74f579
$ git cat-file -p d8329fc1cc938780ffdd9f94e0d364e0ea74f579
100644 blob 83baae61804e65cc73a7201a7252750c76066a30      test.txt
Můžete si také ověřit, že jde skutečně o objekt stromu:
$ git cat-file -t d8329fc1cc938780ffdd9f94e0d364e0ea74f579
tree
You’ll now create a new tree with the second version of test.txt and a new file as well:
$ echo 'new file' > new.txt
$ git update-index test.txt
$ git update-index --add new.txt
Your staging area now has the new version of test.txt as well as the new file new.txt.
Uložte tento strom (zaznamenáním stavu oblasti připravených změn neboli indexu do objektu stromu) a prohlédněte si výsledek:
$ git write-tree
0155eb4229851634a0f03eb265b69f5a2d56f341
$ git cat-file -p 0155eb4229851634a0f03eb265b69f5a2d56f341
100644 blob fa49b077972391ad58037050f2a75f74e3671e92      new.txt
100644 blob 1f7a7a472abf3dd9643fd615f6da379c4acb3e3a      test.txt
Notice that this tree has both file entries and also that the test.txt SHA-1 is the “version 2” SHA-1 from earlier (1f7a7a).
Just for fun, you’ll add the first tree as a subdirectory into this one.
Stromy můžete do oblasti připravených změn načíst příkazem read-tree.
V tomto případě můžete načíst existující strom jako podstrom do oblasti připravených změn pomocí parametru --prefix, který zadáte k příkazu read-tree:
$ git read-tree --prefix=bak d8329fc1cc938780ffdd9f94e0d364e0ea74f579
$ git write-tree
3c4e9cd789d88d8d89c1073707c3585e41b0e614
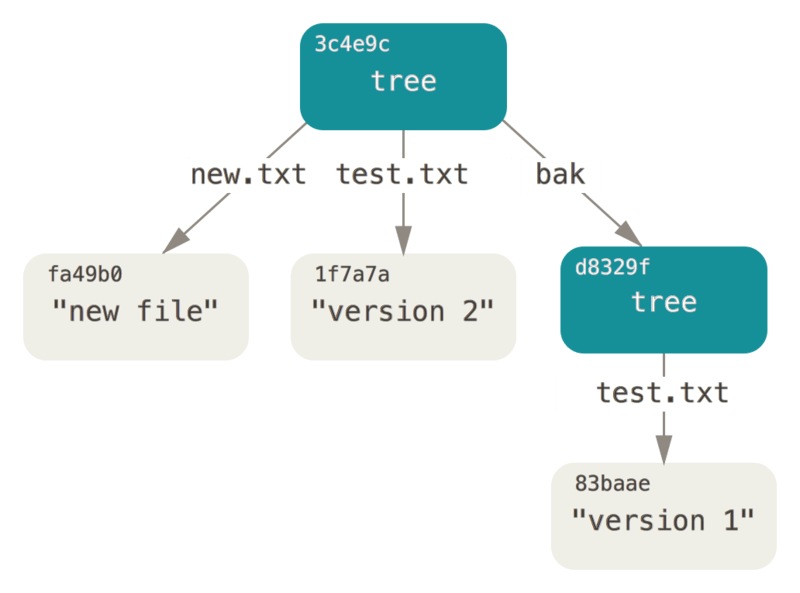
$ git cat-file -p 3c4e9cd789d88d8d89c1073707c3585e41b0e614
040000 tree d8329fc1cc938780ffdd9f94e0d364e0ea74f579      bak
100644 blob fa49b077972391ad58037050f2a75f74e3671e92      new.txt
100644 blob 1f7a7a472abf3dd9643fd615f6da379c4acb3e3a      test.txt
If you created a working directory from the new tree you just wrote, you would get the two files in the top level of the working directory and a subdirectory named bak that contained the first version of the test.txt file.
You can think of the data that Git contains for these structures as being like this:

Commit Objects
Máte vytvořeny tři stromy označující různé snímky vašeho projektu, jež chcete sledovat. Původního problému jsme se však stále nezbavili: musíte si pamatovat všechny tři hodnoty SHA-1, abyste mohli snímky znovu vyvolat. You also don’t have any information about who saved the snapshots, when they were saved, or why they were saved. Toto jsou základní informace, které obsahuje objekt revize.
Pro vytvoření objektu revize zavolejte příkaz commit-tree a zadejte jeden SHA-1 stromu a eventuální objekty revize, které mu bezprostředně předcházely.
Začněte prvním stromem, který jste zapsali:
$ echo 'first commit' | git commit-tree d8329f
fdf4fc3344e67ab068f836878b6c4951e3b15f3d
You will get a different hash value because of different creation time and author data.
Replace commit and tag hashes with your own checksums further in this chapter.
Nyní se můžete podívat na nově vytvořený objekt revize. Použijte příkaz cat-file:
$ git cat-file -p fdf4fc3
tree d8329fc1cc938780ffdd9f94e0d364e0ea74f579
author Scott Chacon <schacon@gmail.com> 1243040974 -0700
committer Scott Chacon <schacon@gmail.com> 1243040974 -0700

first commit
The format for a commit object is simple: it specifies the top-level tree for the snapshot of the project at that point; the author/committer information (which uses your user.name and user.email configuration settings and a timestamp); a blank line, and then the commit message.
Next, you’ll write the other two commit objects, each referencing the commit that came directly before it:
$ echo 'second commit' | git commit-tree 0155eb -p fdf4fc3
cac0cab538b970a37ea1e769cbbde608743bc96d
$ echo 'third commit'  | git commit-tree 3c4e9c -p cac0cab
1a410efbd13591db07496601ebc7a059dd55cfe9
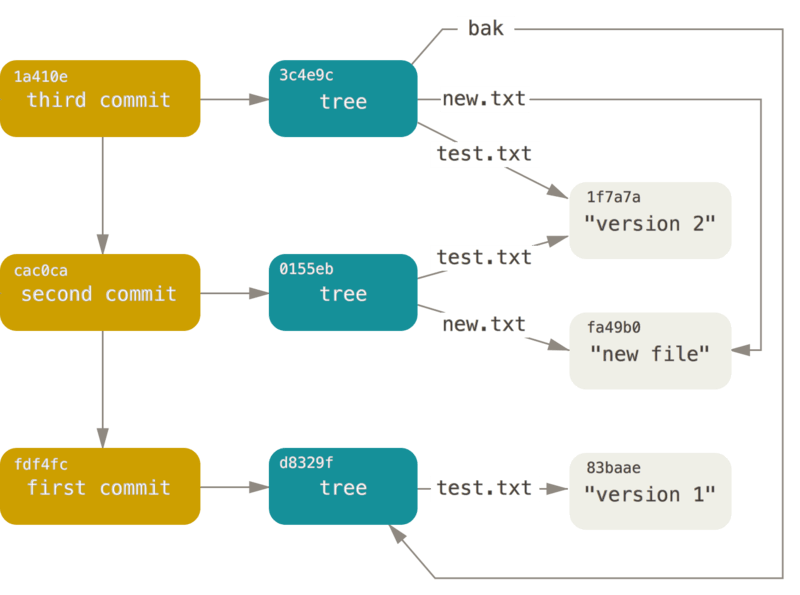
Všechny tři tyto objekty revizí ukazují na jeden ze tří stromů snímku, který jste vytvořili.
Může se to zdát zvláštní, ale nyní máte vytvořenu skutečnou historii revizí Git, kterou lze zobrazit příkazem git log spuštěným pro hodnotu SHA-1 poslední revize:
$ git log --stat 1a410e
commit 1a410efbd13591db07496601ebc7a059dd55cfe9
Author: Scott Chacon <schacon@gmail.com>
Date:   Fri May 22 18:15:24 2009 -0700

	third commit

 bak/test.txt | 1 +
 1 file changed, 1 insertion(+)

commit cac0cab538b970a37ea1e769cbbde608743bc96d
Author: Scott Chacon <schacon@gmail.com>
Date:   Fri May 22 18:14:29 2009 -0700

	second commit

 new.txt  | 1 +
 test.txt | 2 +-
 2 files changed, 2 insertions(+), 1 deletion(-)

commit fdf4fc3344e67ab068f836878b6c4951e3b15f3d
Author: Scott Chacon <schacon@gmail.com>
Date:   Fri May 22 18:09:34 2009 -0700

    first commit

 test.txt | 1 +
 1 file changed, 1 insertion(+)
Úžasné!
You’ve just done the low-level operations to build up a Git history without using any of the front end commands.
This is essentially what Git does when you run the git add and git commit commands – it stores blobs for the files that have changed, updates the index, writes out trees, and writes commit objects that reference the top-level trees and the commits that came immediately before them.
These three main Git objects – the blob, the tree, and the commit – are initially stored as separate files in your .git/objects directory.
Toto jsou všechny objekty v ukázkovém adresáři spolu s komentářem k tomu co obsahují:
$ find .git/objects -type f
.git/objects/01/55eb4229851634a0f03eb265b69f5a2d56f341 # tree 2
.git/objects/1a/410efbd13591db07496601ebc7a059dd55cfe9 # commit 3
.git/objects/1f/7a7a472abf3dd9643fd615f6da379c4acb3e3a # test.txt v2
.git/objects/3c/4e9cd789d88d8d89c1073707c3585e41b0e614 # tree 3
.git/objects/83/baae61804e65cc73a7201a7252750c76066a30 # test.txt v1
.git/objects/ca/c0cab538b970a37ea1e769cbbde608743bc96d # commit 2
.git/objects/d6/70460b4b4aece5915caf5c68d12f560a9fe3e4 # 'test content'
.git/objects/d8/329fc1cc938780ffdd9f94e0d364e0ea74f579 # tree 1
.git/objects/fa/49b077972391ad58037050f2a75f74e3671e92 # new.txt
.git/objects/fd/f4fc3344e67ab068f836878b6c4951e3b15f3d # commit 1
If you follow all the internal pointers, you get an object graph something like this:

Ukládání objektů
We mentioned earlier that a header is stored with the content. Let’s take a minute to look at how Git stores its objects. You’ll see how to store a blob object – in this case, the string “what is up, doc?” – interactively in the Ruby scripting language.
Interaktivní režim Ruby spustíte příkazem irb:
$ irb
>> content = "what is up, doc?"
=> "what is up, doc?"
Git vytvoří záhlaví, které bude začínat typem objektu, jímž je v našem případě blob. Poté vloží mezeru, za níž bude následovat velikost obsahu a na konec nulový byte:
>> header = "blob #{content.length}\0"
=> "blob 16\u0000"
Git vytvoří řetězec ze záhlaví a původního obsahu a vypočítá kontrolní součet SHA-1 tohoto nového obsahu.
V Ruby můžete hodnotu SHA-1 daného řetězce spočítat tak, že příkazem require připojíte knihovnu pro počítání SHA1 a zavoláte Digest::SHA1.hexdigest() s daným řetězcem:
>> store = header + content
=> "blob 16\u0000what is up, doc?"
>> require 'digest/sha1'
=> true
>> sha1 = Digest::SHA1.hexdigest(store)
=> "bd9dbf5aae1a3862dd1526723246b20206e5fc37"
Git zkomprimuje nový obsah metodou zlib, která je obsažena v knihovně zlib.
Nejprve je třeba vyžádat si knihovnu a poté na obsah spustit příkaz Zlib::Deflate.deflate():
>> require 'zlib'
=> true
>> zlib_content = Zlib::Deflate.deflate(store)
=> "x\x9CK\xCA\xC9OR04c(\xCFH,Q\xC8,V(-\xD0QH\xC9O\xB6\a\x00_\x1C\a\x9D"
Finally, you’ll write your zlib-deflated content to an object on disk.
You’ll determine the path of the object you want to write out (the first two characters of the SHA-1 value being the subdirectory name, and the last 38 characters being the filename within that directory).
In Ruby, you can use the FileUtils.mkdir_p() function to create the subdirectory if it doesn’t exist.
Poté zadejte File.open() pro otevření souboru a voláním write() na vzniklý identifikátor souboru zapište do souboru právě zkomprimovaný (zlib) obsah:
>> path = '.git/objects/' + sha1[0,2] + '/' + sha1[2,38]
=> ".git/objects/bd/9dbf5aae1a3862dd1526723246b20206e5fc37"
>> require 'fileutils'
=> true
>> FileUtils.mkdir_p(File.dirname(path))
=> ".git/objects/bd"
>> File.open(path, 'w') { |f| f.write zlib_content }
=> 32
That’s it – you’ve created a valid Git blob object. All Git objects are stored the same way, just with different types – instead of the string blob, the header will begin with commit or tree. A navíc, zatímco obsahem blobu může být téměř cokoliv, obsah revize nebo stromu má velmi specifický formát.
