-
1. Pagsisimula
-
2. Mga Pangunahing Kaalaman sa Git
-
3. Pag-branch ng Git
-
4. Git sa Server
- 4.1 Ang Mga Protokol
- 4.2 Pagkuha ng Git sa isang Server
- 4.3 Ang paglikha ng iyong Pampublikong Susi ng SSH
- 4.4 Pag-Setup ng Server
- 4.5 Git Daemon
- 4.6 Smart HTTP
- 4.7 GitWeb
- 4.8 GitLab
- 4.9 Mga Opsyon ng Naka-host sa Third Party
- 4.10 Buod
-
5. Distributed Git
- 5.1 Distributed Workflows
- 5.2 Contributing to a Project
- 5.3 Maintaining a Project
- 5.4 Summary
-
6. GitHub
-
7. Mga Git na Kasangkapan
- 7.1 Pagpipili ng Rebisyon
- 7.2 Staging na Interactive
- 7.3 Pag-stash at Paglilinis
- 7.4 Pag-sign sa Iyong Trabaho
- 7.5 Paghahanap
- 7.6 Pagsulat muli ng Kasaysayan
- 7.7 Ang Reset Demystified
- 7.8 Advanced na Pag-merge
- 7.9 Ang Rerere
- 7.10 Pagdebug gamit ang Git
- 7.11 Mga Submodule
- 7.12 Pagbibigkis
- 7.13 Pagpapalit
- 7.14 Kredensyal na ImbakanCredential Storage
- 7.15 Buod
-
8. Pag-aangkop sa Sariling Pangangailagan ng Git
- 8.1 Kompigurasyon ng Git
- 8.2 Mga Katangian ng Git
- 8.3 Mga Hook ng Git
- 8.4 An Example Git-Enforced Policy
- 8.5 Buod
-
9. Ang Git at iba pang mga Sistema
- 9.1 Git bilang isang Kliyente
- 9.2 Paglilipat sa Git
- 9.3 Buod
-
10. Mga Panloob ng GIT
- 10.1 Plumbing and Porcelain
- 10.2 Git Objects
- 10.3 Git References
- 10.4 Packfiles
- 10.5 Ang Refspec
- 10.6 Transfer Protocols
- 10.7 Pagpapanatili At Pagbalik ng Datos
- 10.8 Mga Variable sa Kapaligiran
- 10.9 Buod
-
A1. Appendix A: Git in Other Environments
- A1.1 Grapikal Interfaces
- A1.2 Git in Visual Studio
- A1.3 Git sa Eclipse
- A1.4 Git in Bash
- A1.5 Git in Zsh
- A1.6 Git sa Powershell
- A1.7 Summary
-
A2. Appendix B: Pag-embed ng Git sa iyong Mga Aplikasyon
- A2.1 Command-line Git
- A2.2 Libgit2
- A2.3 JGit
-
A3. Appendix C: Mga Kautusan ng Git
- A3.1 Setup at Config
- A3.2 Pagkuha at Paglikha ng Mga Proyekto
- A3.3 Pangunahing Snapshotting
- A3.4 Branching at Merging
- A3.5 Pagbabahagi at Pagbabago ng mga Proyekto
- A3.6 Pagsisiyasat at Paghahambing
- A3.7 Debugging
- A3.8 Patching
- A3.9 Email
- A3.10 External Systems
- A3.11 Administration
- A3.12 Pagtutuberong mga Utos
7.7 Mga Git na Kasangkapan - Ang Reset Demystified
Ang Reset Demystified
Bago lumipat sa mas natatanging mga kasangkapan, pag-usapan natin ang tungkol sa Git ang reset at checkout na mga utos.
Ang mga utos na ito ay dalawang pinakanakakalito na mga parte sa Git na kapag una mong nakasalubong sila.
Marami silang ginawa sa mga bagay na tila walang pag-asa upang aktwal na maunawaan ang mga ito at gumamit nila ng maayos.
Para dito, inirerekumenda natin ang isang simpleng metapora.
Ang Tatlong mga Tree
Isang mas madaling paraan para isipin ang tungkol sa reset at checkout ay sa pamamagitan ng mental frame sa Git sa pagiging tagapamahala ng nilalaman sa tatlong magkaibang mga tree.
Sa pamamagitan ng “tree” dito, talagang ibig sabihin nito ay “collection of files”, hindi particular na kaayusan ng datos.
(Mayroong ilang mga kaso na kung saan ang index ay hindi eksaktong kumikilos tulad ng isang tree, para sa aming mga gamit ito ay mas madali para isipin ang tungkol nito sa ganitong paraan para sa ngayon.)
Ang Git bilang isang sistemang namamahala at humahawak sa tatlong mga tree sa kanyang normal na operasyon:
| Tree | Role |
|---|---|
HEAD |
Huling commit ng snapshot, susunod na magulang |
Index |
Inimungkahing susunod na commit ng snapshot |
Tinatrabahong Direktoryo |
Sandbox |
Ang HEAD
Ang HEAD ay ang puntero sa kasalukuyang branch na reperensiya, na kung saan ay inikot ang puntero sa huling commit na nagawa sa branch na iyon. Ibig sabihin na ang HEAD ay maging magulang sa susunod na commit na nilikha. Sa pangkalahatan ang pinakasimple na maisip sa HEAD bilang snapshot sa iyong huling commit sa branch na iyon.
Sa katunayan, ito ay medyo madali para tingnan kung ano ang mukha ng snapshot. Narito ang isang halimbawa sa aktwal na direktoryo na listahan at SHA-1 na mga checksum para sa bawat file sa HEAD na snapshot:
$ git cat-file -p HEAD
tree cfda3bf379e4f8dba8717dee55aab78aef7f4daf
author Scott Chacon  1301511835 -0700
committer Scott Chacon  1301511835 -0700

initial commit

$ git ls-tree -r HEAD
100644 blob a906cb2a4a904a152...   README
100644 blob 8f94139338f9404f2...   Rakefile
040000 tree 99f1a6d12cb4b6f19...   lib
Ang Git cat-file at ls-tree na mga utos ay “plumbing” na mga utos na ginagamit para sa mas mababang antas ng mga bagay at hindi talagang ginagamit sa araw-araw na trabaho, ngunit sila ay nakakatulong sa atin upang makita kung ano ang nangyayari dito.
Ang Index
Ang Index ay ang iyong iminungkahing susunod na commit.
Nag-uulat din kami sa konseptong ito bilang Git na “Staging na Lawak” dahil ito ay kung ano ang tingin ng Git ay makikita kapag ikaw ay nagpatakbo ng git commit.
Ang Git ay nagpaparami ng index na ito na may isang listahan sa lahat ng mga nilalaman ng file na huling na tingnan sa iyong tinatrabahong direktoryo at kung ano ang hitsura nila kapag sila ay orihinal na naka-checkout.
Matapos mong palitan ang ilan sa mga file na iyon na may bagong mga bersyon sa kanila, at ang git commit ay nagpapalit na nasa tree para sa isang bagong commit.
$ git ls-files -s
100644 a906cb2a4a904a152e80877d4088654daad0c859 0	README
100644 8f94139338f9404f26296befa88755fc2598c289 0	Rakefile
100644 47c6340d6459e05787f644c2447d2595f5d3a54b 0	lib/simplegit.rb
Muli, dito kami gumagamit ng git ls-files, na kung saan ay higit pa sa isang likod ng mga eksekna na utos na nagpapakita sa iyo kung ano ang mukha ng iyong index.
Ang index ay hindi teknikal na isang istraktura ng tree — ito ay talagang ipinatutupad bilang isang silsilflattened na manipesto — ngunit para sa aming mga layunin ito ay malapit na.
Ang Tinatrabahong Direktoryo
Sa wakas, mayroon kang tinatrabahong direktoryo.
Ang ibang dalawang tree ay nag-iimbak ng kanilang nilalaman sa isang mahusay ngunit hindi maginhawang paraan, sa loob ng .git na folder.
Ang Tinatrabahong Direktoryo ay nag-unpack sa kanila sa aktwal na mga file, na kung saan ay gumagawa ito nang mas madali para sa iyo para i-edit sila.
Isipin ang Tinatrabahong Direktoryo bilang isang sandbox, na kung saan ikaw ay maaaring sumubok ng mga pagbabago bago i-commit sila sa iyong staging na lugar (index) at pagkatapos sa kasaysayan.
$ tree
.
├── README
├── Rakefile
└── lib
    └── simplegit.rb

1 directory, 3 files
Ang Workflow
Ang pangunahing layunin sa Git ay ang pagtatala ng mga snapshot sa iyong proyekto sa sunod-sunod na mas mabuting estado, sa pamamagitan ng pagmamanipula ng mga tatlong mga tree.
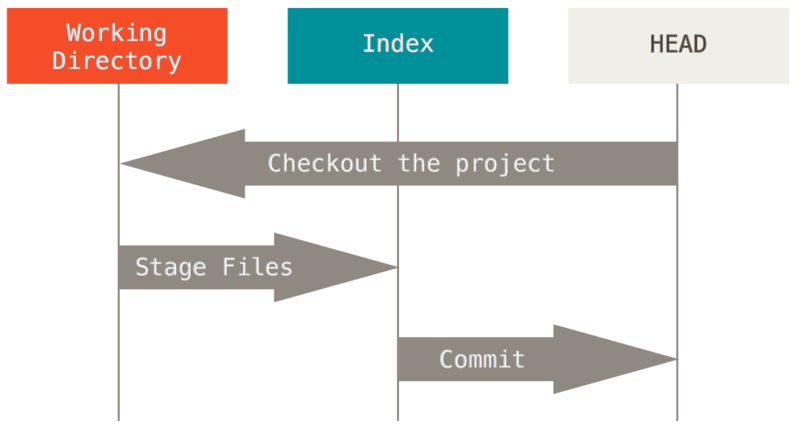
Isalarawan natin ang prosesong ito: sabihin mong pumasok ka sa isang bagong direktoryo na may isang solong file sa loob.
Tatawagan natin itong v1 sa file, at ipapakita natin ito sa asul.
Ngayon nagpatakbo kami ng git init, na kung saan ikaw ay lumikha ng isang Git na repositoryo na may isang HEAD na reperensiya na kung saan ang mga puntos sa isang hindi pa isinisilang na branch (ang master ay hindi umiiral pa).
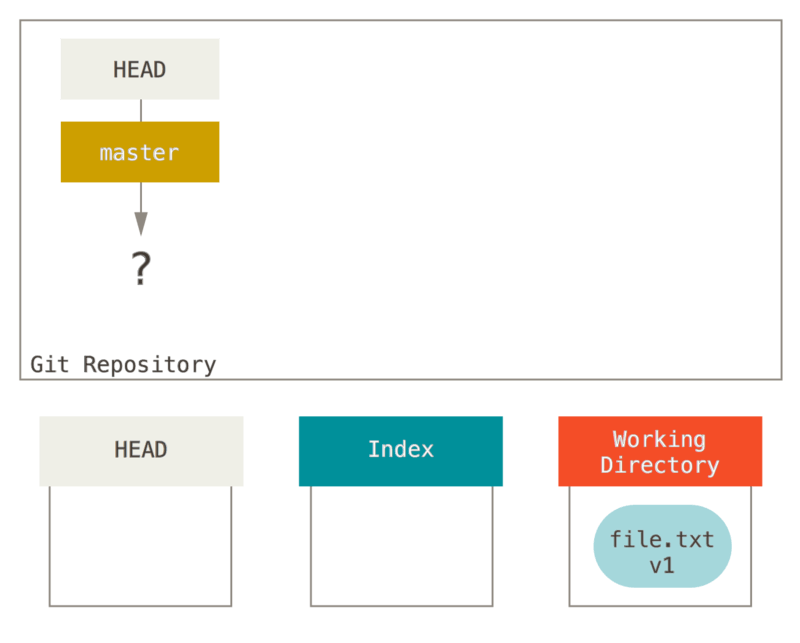
Sa puntong ito, Tanging ang Tinatrabahong Direktoryo na tree ay merong anumang nilalaman.
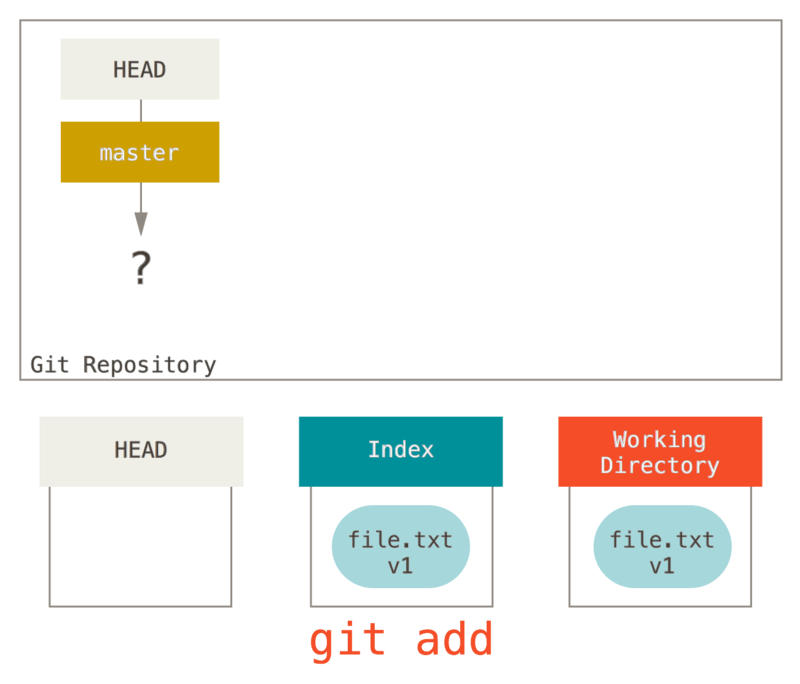
Ngayon gusto nating i-commit ang file na ito, kaya gumamit kami ng git add upang kunin ang nilalaman ng Tinatrabahong Direktoryo at kopyahin ito sa Index.
Pagkatapos ay pinatakbo natin ang git commit, na kumukuha ng mga nilalaman sa Index at sine-save ito bilang isang permanenteng snapshot, lumilikha ng isang commit na bagay na kung saan ay nagtuturo sa snapshot na iyon, at i-update ang master upang ituro ang commit na iyon.
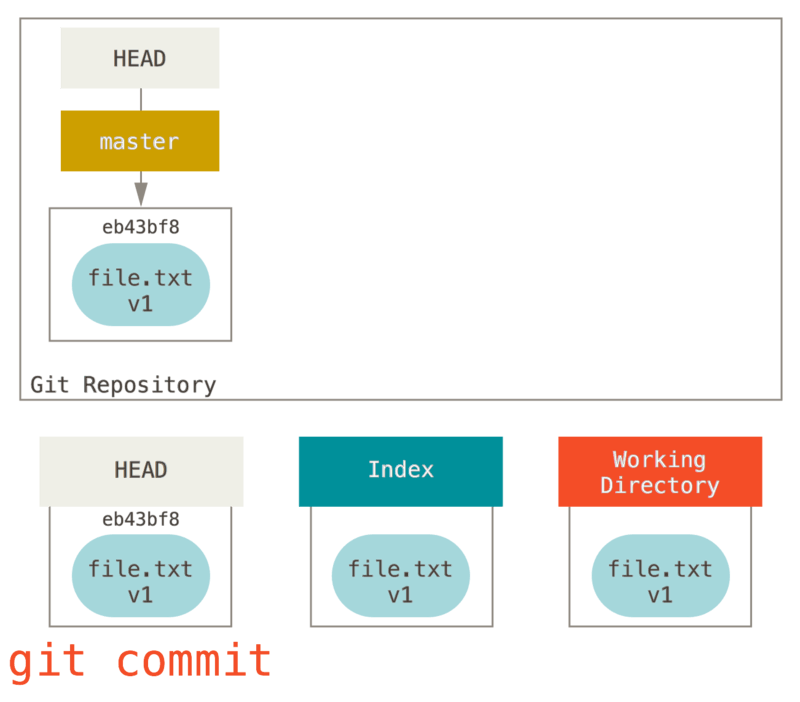
Kung magpatakbo ng git status, hindi kami makakita ng mga pagbabago, dahil lahat ng tatlong mga tree ay pareho lang.
Ngayon gusto nating gumawa ng isang pagbabago sa file na iyon at i-commit ito. Kami ay dumadaan sa parehong proseso; una ay binago natin ang file sa aming tinatrabahong direktoryo. Tawagin natin itong v2 sa file, at ipahiwatig ito sa pula.
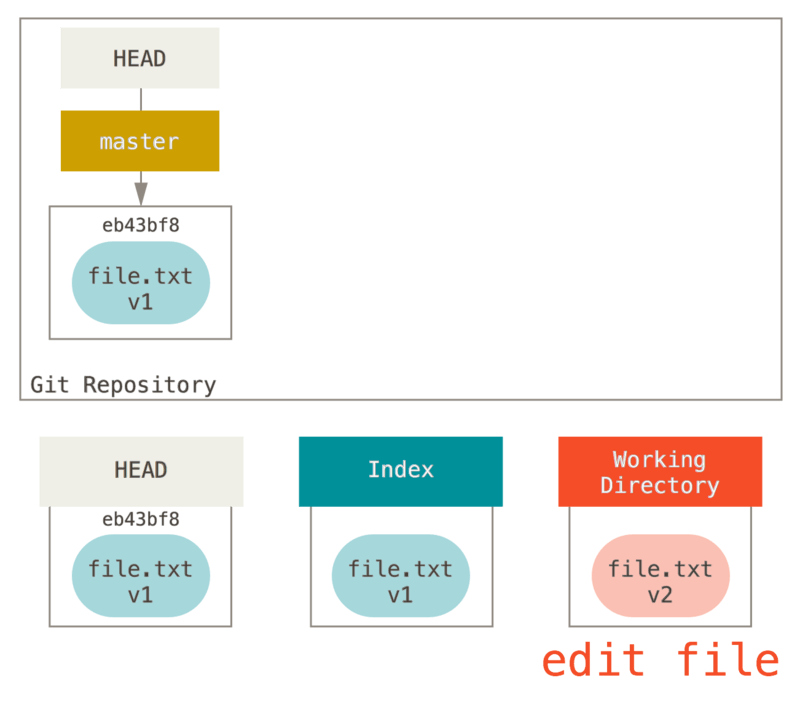
Kung patakbuhin natin ang git status ngayon na, makikita natin ang file sa pula bilang “Pagbabago ay hindi naka-stage para commit,” dahil ang entry na ito ay naiiba ang Index at ang Tinatrabahong Direktoryo.
Susunod pinatakbo natin ang git add dito upang i-stage ito sa ating Index.
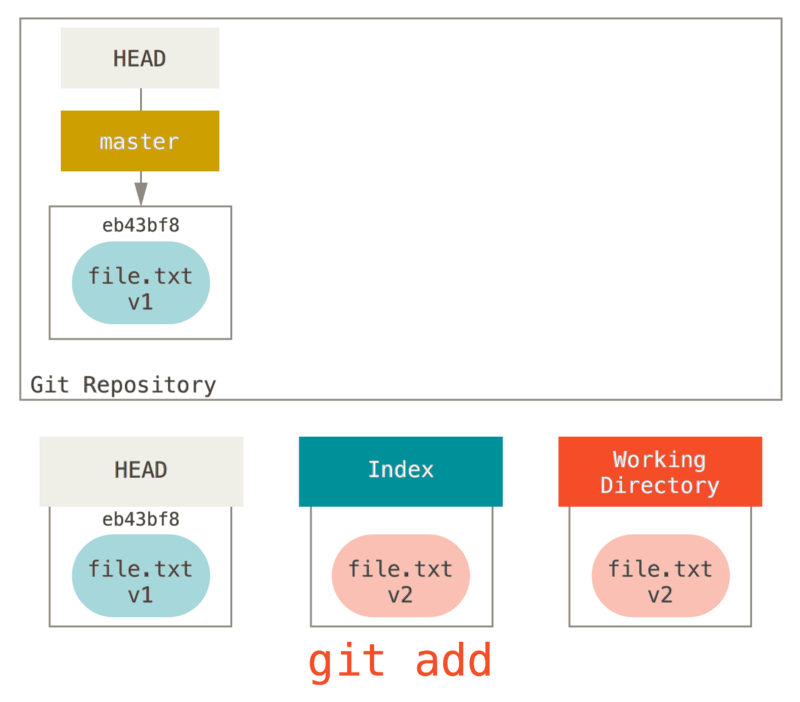
Sa puntong ito, kung ipatakbo natin ang git status, makikita natin ang file sa berde sa ilalim ng “Pagbabago na i-commit” dahil ang Index at HEAD na pagkaiba — yan ay, ang aming iminungkahi sa susunod na commit na ngayon ay naiiba mula sa ating huling commit.
Sa wakas, kami ay nagpatakbo ng git commit upang makumpleto ang commit.
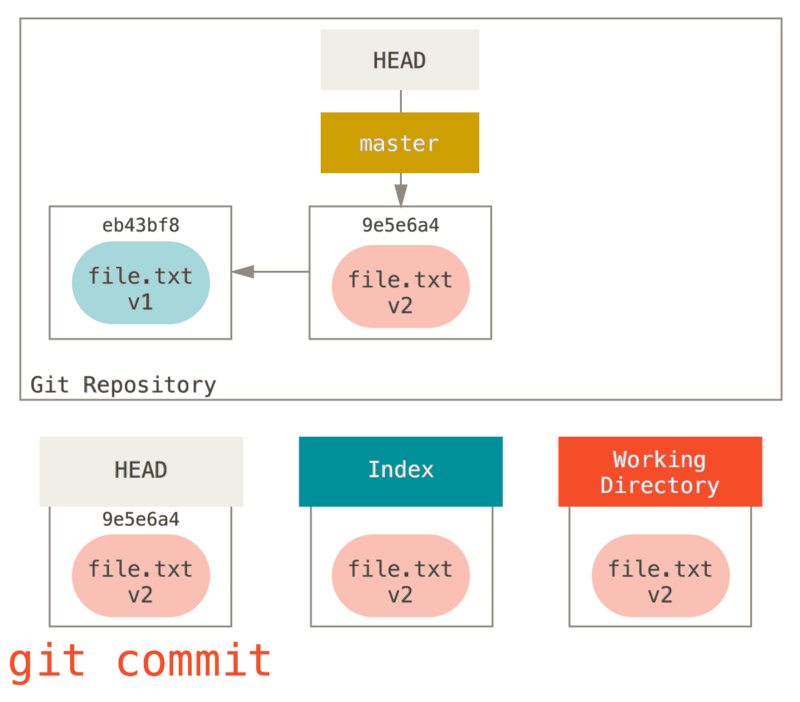
Ngayon ang git status ay magbibigay sa amin nang walang output, dahil lahat ng tatlong mga tree ay pareho muli.
Paglipat ng mga branch o pag-clone ay dumadaan sa isang katulad na proseso. Kapag ikaw ay nag-checkout sa isang branch, ito ay nagbabago ng HEAD upang ituro sa bagong branch na ref, nagpapalaganap na iyong Index na gamit ang snapshot sa commit na iyon, pagkatapos ay kumukopya sa mga nilalaman sa Index sa iyong Tinatrabahong Direktoryo.
Ang Tungkilin ng Reset
Ang reset na utos ay mas makakatulong kapag tiningnan sa kontekstong ito.
Para sa mga layunin sa mga halimbawang ito, sabihin natin na binago natin ang file.txt muli at naka-commit ito sa ikatlong pagkakataon.
Kaya ngayon ang aming kasaysayan ay katulad nito:
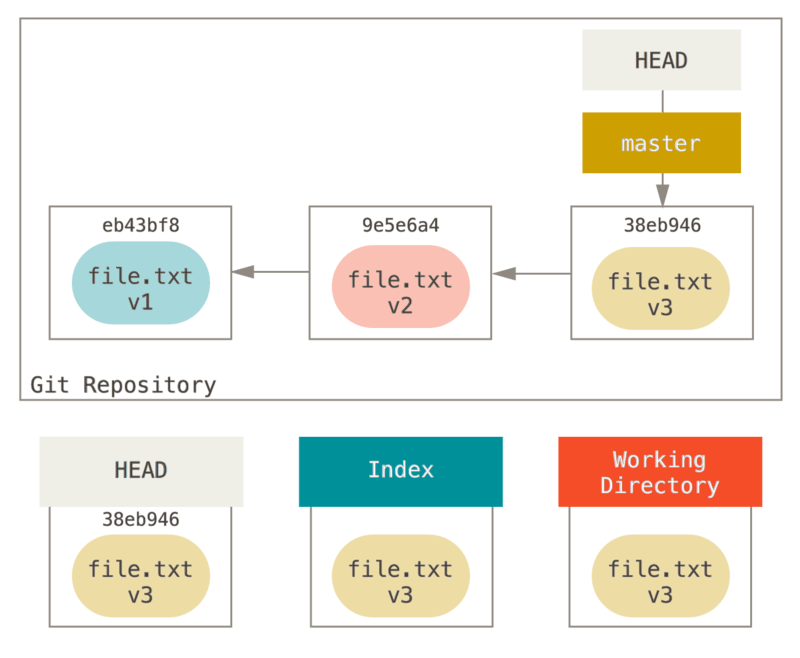
Maglakad na tayo ngayon sa pamamagitan ng eksaktong kung ano ang reset ay kapag tinawag mo ito.
Ito ay direktang nagmanipula ang tatlong mga tree sa isang simple at mahuhulaan na paraan.
Ginagawa ito sa tatlong pangunahing mga operasyon.
Step 1: Ilipat ang HEAD
Ang unang bagay ang reset ay gagawin ay maglipat sa kung ano ang itinuro ng HEAD.
Ito ay hindi pareho bilang pagbabago sa HEAD mismo (kung saan ay anong checkout ang ginagawa); ang reset ay naglilipat sa branch na ang HEAD ay tinuturo.
Nangunguhulugan ito na kung ang HEAD ay nagtakda sa master na branch (i.e. ikaw ay kasalukuyang nasa master na branch), tumatakbong git reset 9e5e6a4 ay magsisimula sa paggawa ng master na tumuturo sa 9e5e6a4.
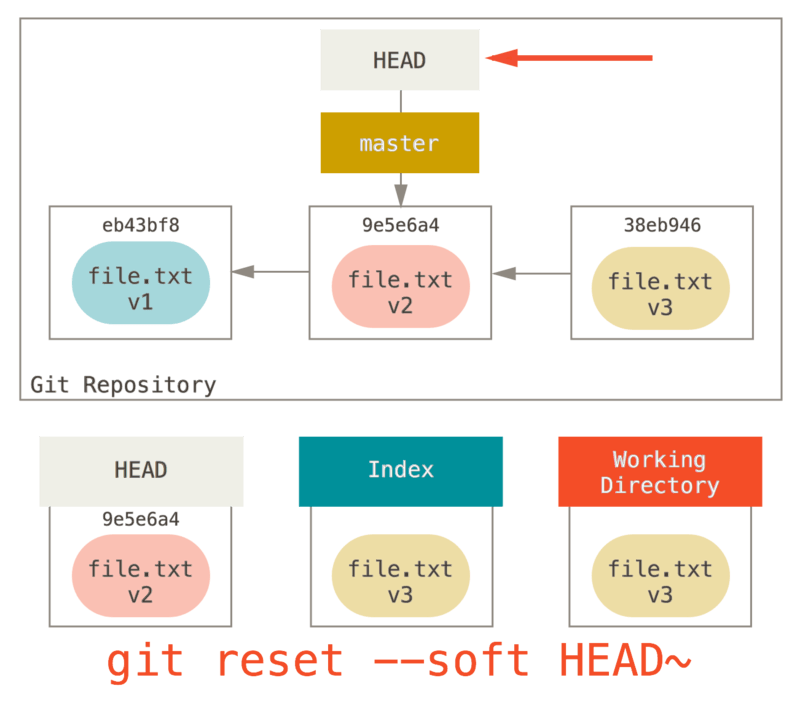
Hindi mahalaga kung anong porma ng reset na may isang commit na iyong tinawag, ito ang unang bagay na laging sinusubukang gawin.
Sa reset --soft, ito ay hihinto lamang doon.
Ngayon ay tumagal ng isang segundo para tumingin sa diagram at magpatanto kung ano ang nangyari: ito ay talagang hindi mabubuhay ang huling git commit na utos.
Kapag pinatakbo mo ang git commit, ang Git ay lumilikha ng isang bagong commit at naglilipat ng branch na ang HEAD ay tinuturo dito.
Kapag ikaw ay nag reset pabalik sa HEAD~ (ang magulang sa HEAD), ikaw ay naglilipat sa branch pabalik kung saan ito nagmula, nang walang pagbabago ang Index o Tinatrabahong Direktoryo.
Maaari mo na ngayong i-update ang Index at patakbuhin ang git commit ay muling tuparin ang kung ano ang git commit --amend na sana tapos na (see Pagbabago sa Huling Commit).
Step 2: Updating the Index (--mixed)
Note that if you run git status now you’ll see in green the difference between the Index and what the new HEAD is.
The next thing reset will do is to update the Index with the contents of whatever snapshot HEAD now points to.
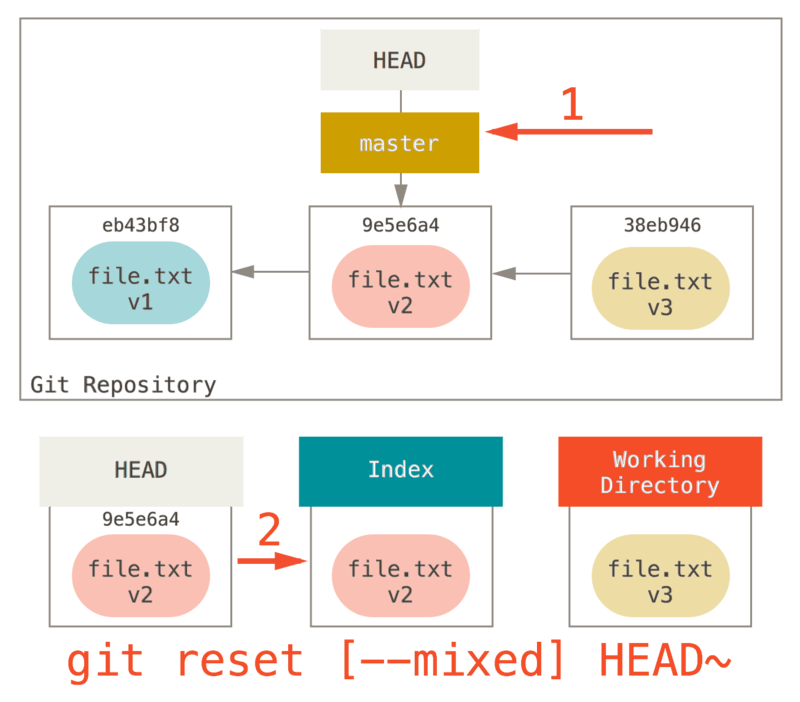
If you specify the --mixed option, reset will stop at this point.
This is also the default, so if you specify no option at all (just git reset HEAD~ in this case), this is where the command will stop.
Now take another second to look at that diagram and realize what happened: it still undid your last commit, but also unstaged everything.
You rolled back to before you ran all your git add and git commit commands.
Step 3: Updating the Working Directory (--hard)
The third thing that reset will do is to make the Working Directory look like the Index.
If you use the --hard option, it will continue to this stage.
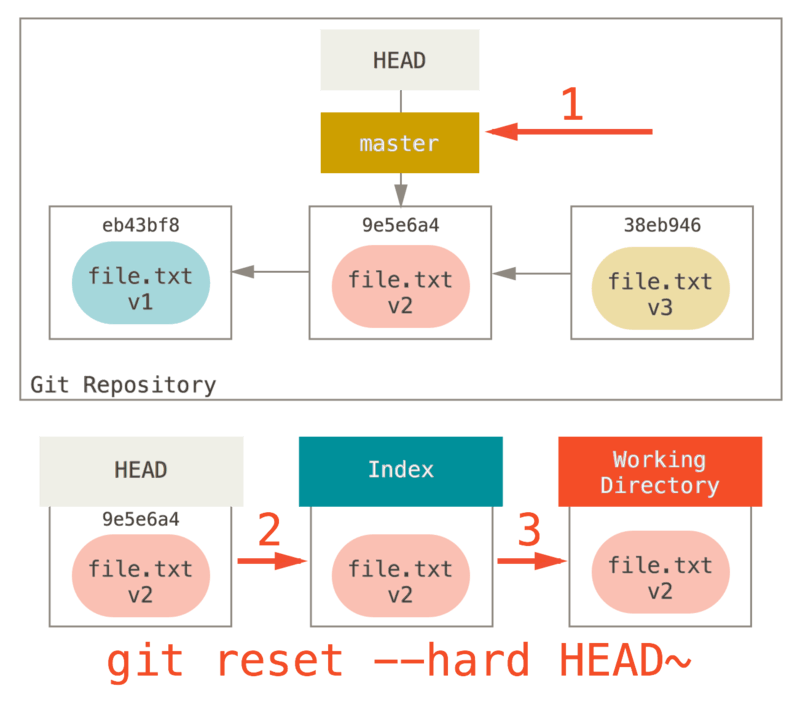
So let’s think about what just happened.
You undid your last commit, the git add and git commit commands, and all the work you did in your working directory.
It’s important to note that this flag (--hard) is the only way to make the reset command dangerous, and one of the very few cases where Git will actually destroy data.
Any other invocation of reset can be pretty easily undone, but the --hard option cannot, since it forcibly overwrites files in the Working Directory.
In this particular case, we still have the v3 version of our file in a commit in our Git DB, and we could get it back by looking at our reflog, but if we had not committed it, Git still would have overwritten the file and it would be unrecoverable.
Recap
The reset command overwrites these three trees in a specific order, stopping when you tell it to:
-
Move the branch HEAD points to (stop here if
--soft) -
Make the Index look like HEAD (stop here unless
--hard) -
Make the Working Directory look like the Index
Reset With a Path
That covers the behavior of reset in its basic form, but you can also provide it with a path to act upon.
If you specify a path, reset will skip step 1, and limit the remainder of its actions to a specific file or set of files.
This actually sort of makes sense — HEAD is just a pointer, and you can’t point to part of one commit and part of another.
But the Index and Working directory can be partially updated, so reset proceeds with steps 2 and 3.
So, assume we run git reset file.txt.
This form (since you did not specify a commit SHA-1 or branch, and you didn’t specify --soft or --hard) is shorthand for git reset --mixed HEAD file.txt, which will:
-
Move the branch HEAD points to (skipped)
-
Make the Index look like HEAD (stop here)
So it essentially just copies file.txt from HEAD to the Index.
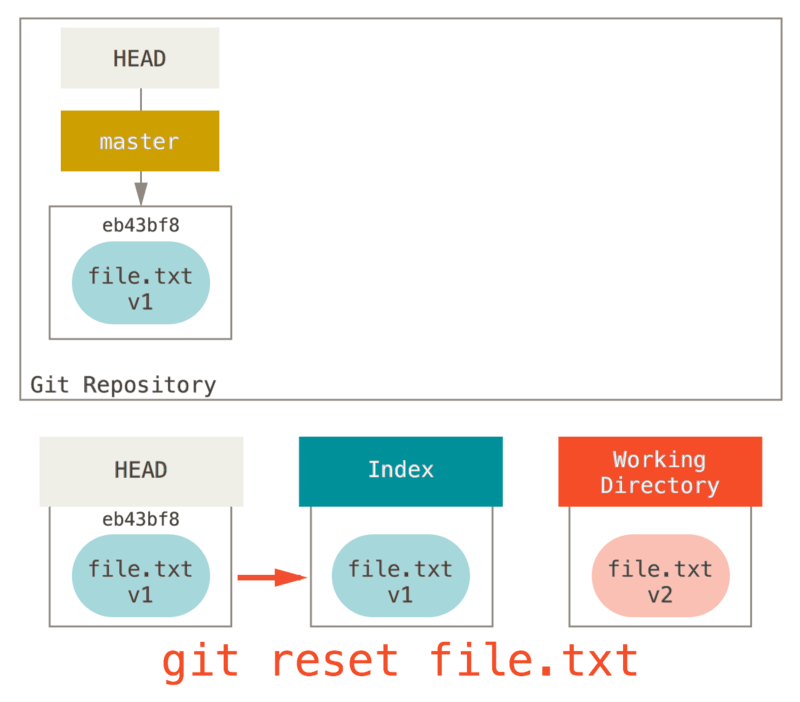
This has the practical effect of unstaging the file.
If we look at the diagram for that command and think about what git add does, they are exact opposites.
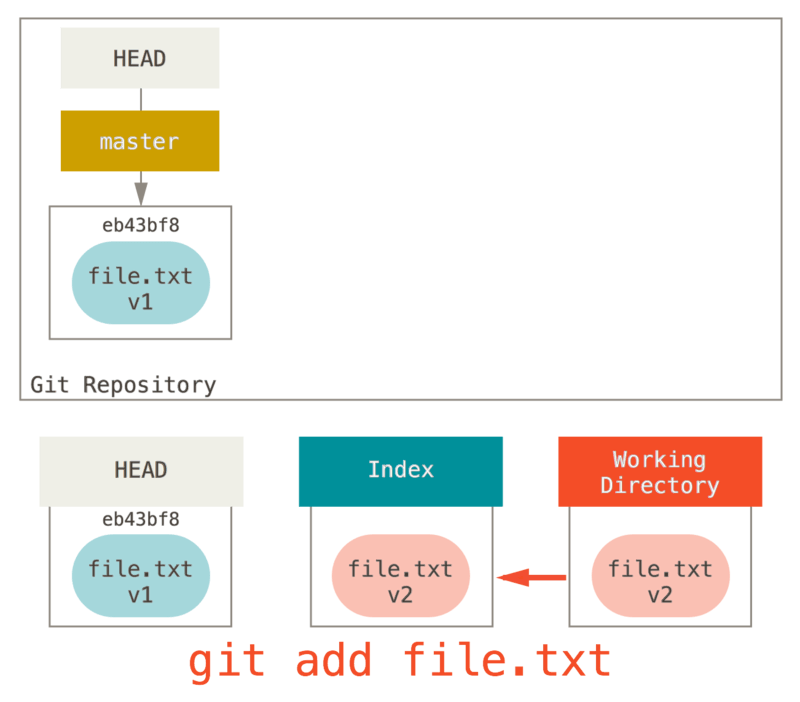
This is why the output of the git status command suggests that you run this to unstage a file.
(See Hindi pagyuyugto ng isang Yugtong File for more on this.)
We could just as easily not let Git assume we meant “pull the data from HEAD” by specifying a specific commit to pull that file version from.
We would just run something like git reset eb43bf file.txt.
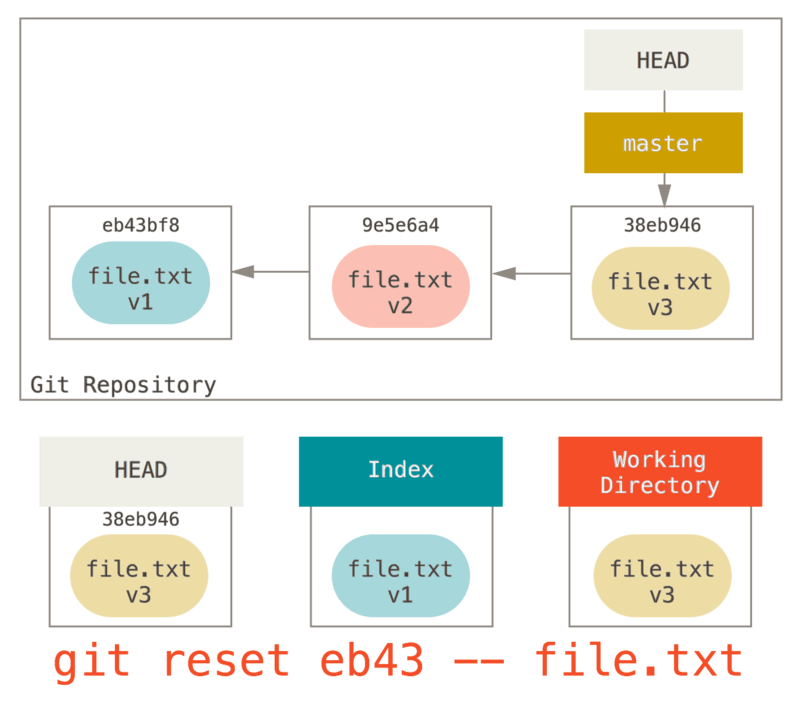
This effectively does the same thing as if we had reverted the content of the file to v1 in the Working Directory, ran git add on it, then reverted it back to v3 again (without actually going through all those steps).
If we run git commit now, it will record a change that reverts that file back to v1, even though we never actually had it in our Working Directory again.
It’s also interesting to note that like git add, the reset command will accept a --patch option to unstage content on a hunk-by-hunk basis.
So you can selectively unstage or revert content.
Squashing
Let’s look at how to do something interesting with this newfound power — squashing commits.
Say you have a series of commits with messages like “oops.”, “WIP” and “forgot this file”.
You can use reset to quickly and easily squash them into a single commit that makes you look really smart.
(Pag-squash ng mga Commit shows another way to do this, but in this example it’s simpler to use reset.)
Let’s say you have a project where the first commit has one file, the second commit added a new file and changed the first, and the third commit changed the first file again. The second commit was a work in progress and you want to squash it down.
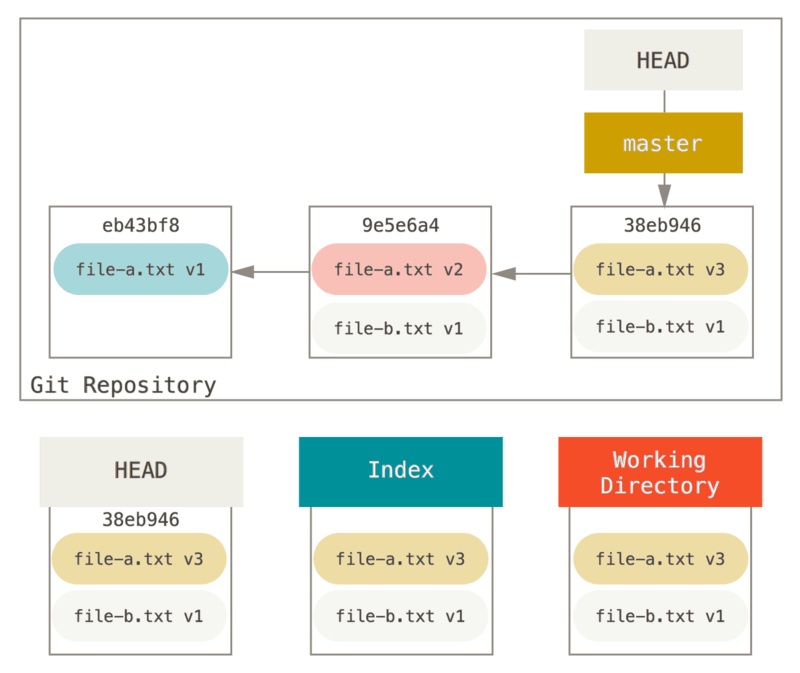
You can run git reset --soft HEAD~2 to move the HEAD branch back to an older commit (the most recent commit you want to keep):
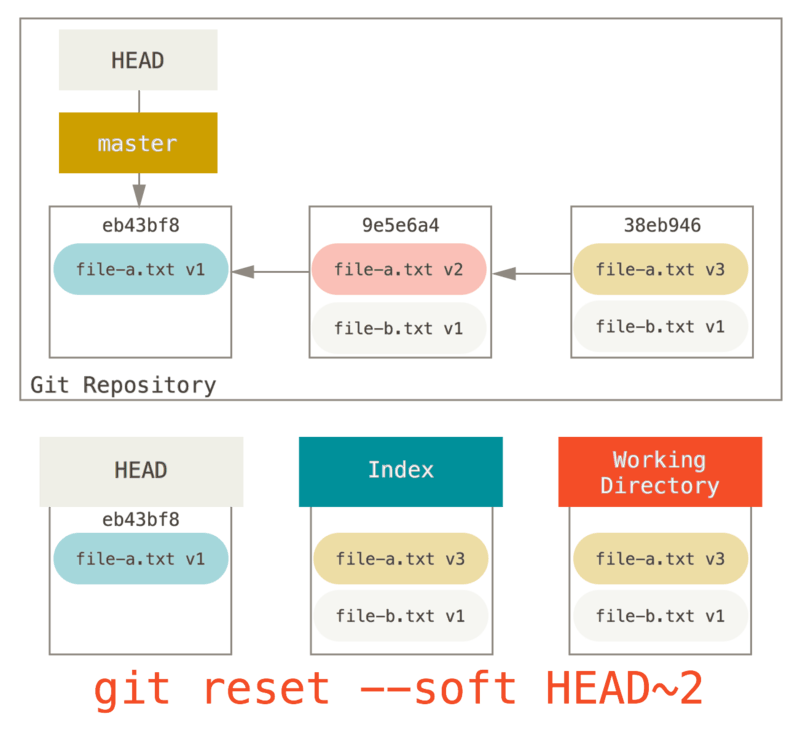
And then simply run git commit again:
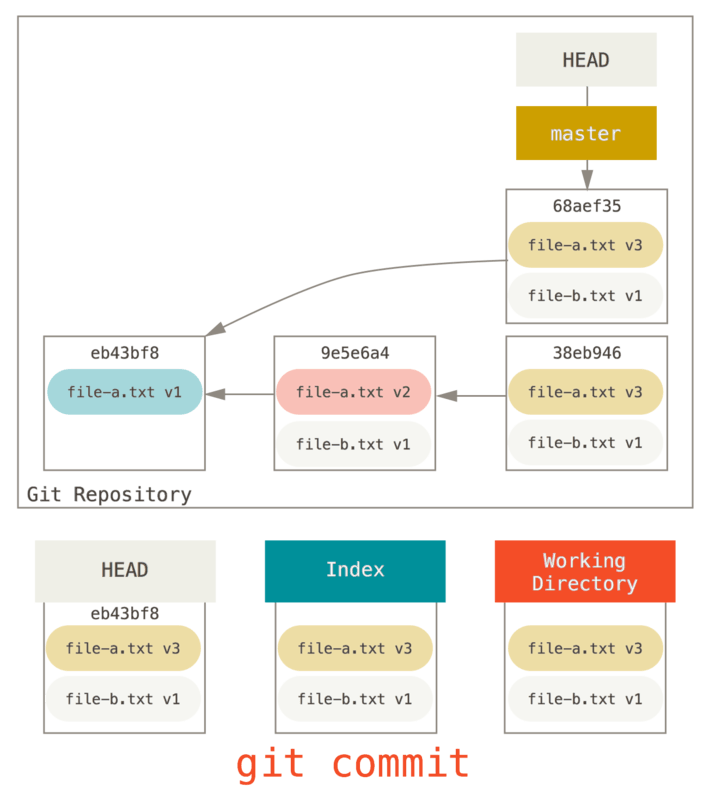
Now you can see that your reachable history, the history you would push, now looks like you had one commit with file-a.txt v1, then a second that both modified file-a.txt to v3 and added file-b.txt.
The commit with the v2 version of the file is no longer in the history.
Check It Out
Finally, you may wonder what the difference between checkout and reset is.
Like reset, checkout manipulates the three trees, and it is a bit different depending on whether you give the command a file path or not.
Without Paths
Running git checkout [branch] is pretty similar to running git reset --hard [branch] in that it updates all three trees for you to look like [branch], but there are two important differences.
First, unlike reset --hard, checkout is working-directory safe; it will check to make sure it’s not blowing away files that have changes to them.
Actually, it’s a bit smarter than that — it tries to do a trivial merge in the Working Directory, so all of the files you haven’t changed will be updated.
reset --hard, on the other hand, will simply replace everything across the board without checking.
The second important difference is how checkout updates HEAD.
Whereas reset will move the branch that HEAD points to, checkout will move HEAD itself to point to another branch.
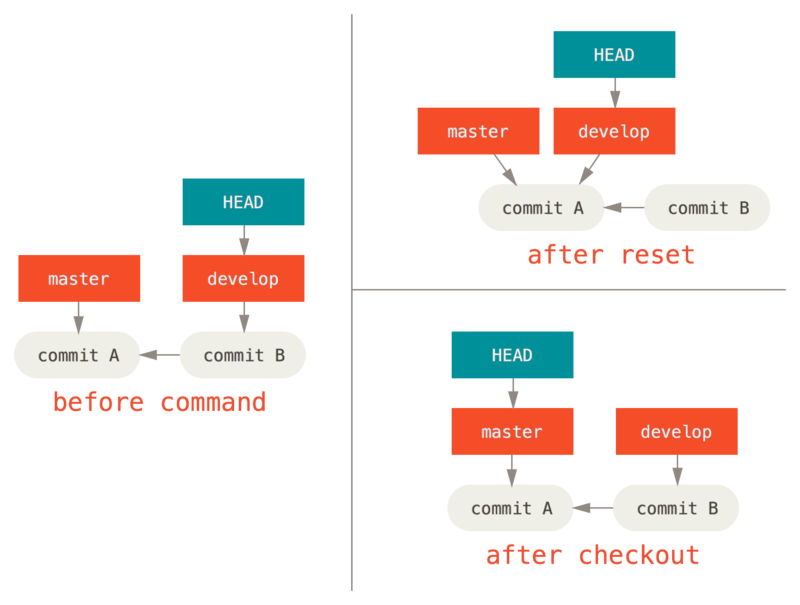
For instance, say we have master and develop branches which point at different commits, and we’re currently on develop (so HEAD points to it).
If we run git reset master, develop itself will now point to the same commit that master does.
If we instead run git checkout master, develop does not move, HEAD itself does.
HEAD will now point to master.
So, in both cases we’re moving HEAD to point to commit A, but how we do so is very different.
reset will move the branch HEAD points to, checkout moves HEAD itself.
With Paths
The other way to run checkout is with a file path, which, like reset, does not move HEAD.
It is just like git reset [branch] file in that it updates the index with that file at that commit, but it also overwrites the file in the working directory.
It would be exactly like git reset --hard [branch] file (if reset would let you run that) — it’s not working-directory safe, and it does not move HEAD.
Also, like git reset and git add, checkout will accept a --patch option to allow you to selectively revert file contents on a hunk-by-hunk basis.
Summary
Hopefully now you understand and feel more comfortable with the reset command, but are probably still a little confused about how exactly it differs from checkout and could not possibly remember all the rules of the different invocations.
Here’s a cheat-sheet for which commands affect which trees. The “HEAD” column reads “REF” if that command moves the reference (branch) that HEAD points to, and “HEAD” if it moves HEAD itself. Pay especial attention to the WD Safe? column — if it says NO, take a second to think before running that command.
| HEAD | Index | Workdir | WD Safe? | |
|---|---|---|---|---|
Commit Level |
||||
|
REF |
NO |
NO |
YES |
|
REF |
YES |
NO |
YES |
|
REF |
YES |
YES |
NO |
|
HEAD |
YES |
YES |
YES |
File Level |
||||
|
NO |
YES |
NO |
YES |
|
NO |
YES |
YES |
NO |
